2015年7月26日 星期日

Scala Other (Session 10)

Scala Other

Lazy

Scala 允許資源在要使用時才載入。只要在宣告時,加 lazy 這個關鍵字。

eg: 取得資料庫連線

lazy val conn = DriverManager.getConnection
lazy val stmt = conn.preparedStatement(....)
lazy val rs = stmt.executeQuery()

try {
   stmt.setInt(1, xxx)
   
   while (rs.next) {
     ...
   }
}
catch {
  case ex: Exception =>
}
finally {
  DBUtils.close(rs)
  DBUtils.close(stmt)
  DBUtils.close(conn)
}

當執行到 stmt.setInt(1, xxx) 時,才會開始初始化 PreparedStatement,在初始化 PreparedStatement 時,才會去初始化 Connection。

Implicit

Implicit Parameter

Implicit 的技術在 Scala 使用很多,以 collection 為例,從 Java Collection 轉換成 Scala Collection 的版本,都是用 implicit 的方式來完成。

在 OOP 最常見的 implicit 是 this 這個關鍵字。在 OOP 的 Class 內,並沒有宣告 this 這個變數,卻可以使用。

Python 的設計哲學是不允許 implicit 的,因此寫 Python 常會宣告 self 來代表 this。

eg:

scala> implicit val a = 10
a: Int = 10

scala> def test(a: Int)(implicit b: Int) = a + b
test: (a: Int)(implicit b: Int)Int

scala> test(1000)
res0: Int = 1010

當宣告的參數是 implicit 時,Scala Compiler 會去找符合條件的 implicit 變數。

implicit 的設計會讓系統更加靈活,如 Future 使用的 Thread Pool。Scala 有內建 Thread Pool,但也可以自定 Thread Pool 後,修改 import 的部分後,其他的部分不用再修改。

附註: How this work (c++)

Source code:

class CRect {
    private: 
        int m_color;
    public: 
        void setcolor(int color) {
            m_color = color;
        }
}

After Compiling:

class CRect {
    private: 
        int m_color;
    public: 
        void setcolor(int color, (CRect*)this) {
            this->m_color = color;
        }
}

Implicit Conversions

在針對 Java Collection 轉成 Scala 相對應的 Collection,都使用 implicit function 在做轉換。

eg: Scala wrapAsScala

implicit def asScalaBuffer[A](l: ju.List[A]): mutable.Buffer[A] = l match {
  case MutableBufferWrapper(wrapped) => wrapped
  case _ =>new JListWrapper(l)
}

Tail Recursion

Scala Compiler 會針對 Tail Recursion 做最佳化。所謂的 Tail Recursion 是指,把做 recursion 放在最後一個指令。

eg: GCD

def gcd(a: Int, b: Int): Int = if (a == 0) b else gcd(b % a, a)

Recursion 放在最後一行,Scala Compiler 會針對這類型的寫法做最佳化處理。

eg: 非 Tail Recursion,因為最後是 recursive call 後再 + 1。

def boom(x: Int): Int = if (x == 0) throw new Exception("boom!") else boom(x - 1) + 1

執行的結果:

scala> boom(2)
java.lang.Exception: boom!
  at .boom(<console>:7)
  at .boom(<console>:7)
  at .boom(<console>:7)
  ... 33 elided

上例中,最後一行是 boom(x - 1) + 1,因此不是 Tail Recursion。執行的結果中,有三個 .boom,代表有三個 stack frame。所以是以傳統 recursive call 在進行。

需改寫成:

scala> def boom(x: Int): Int = if (x == 0) throw new Exception("boom!") else boom(x - 1)
boom: (x: Int)Int

結果:

scala> boom(2)
java.lang.Exception: boom!
  at .boom(<console>:8)
  ... 33 elided

改寫後的結果,只有一個 .boom。Scala Compiler 會把 Tail Recursion 改寫成只用一個 stack frame 來進行。

範例來自:

Programming in Scala: A Comprehensive Step-by-Step Guide, 2nd Edition

Scala Parallel Computing (Session 9)

Scala Parallel Computing

平行化處理,很適合用在 I/O bound 的程式,讓 I/O 可以同時間被處理,讓 CPU 等待的時間縮到最短。

Future and Await

以往在 Java ,是使用 Thread 來進行計算。Scala 提供 Future 來儲存尚未完成的結果,在使用 Future 時,需要 import concurrent.ExecutionContext.Implicits.global,這一行的用意是使用 Scala 內建的 Thread Pool。在使用 Future 時,會需要使用 Thread 來進行計算。

在 Multi-Thread 環境下,通常主程式需要等待所有的 Thread 完成後,才能結束程式。Scala 提供 Await 等待 Thread 執行的結果。

eg: 同時讀取兩個檔案的內容

package com.example

import scala.concurrent.Await
import scala.concurrent.ExecutionContext.Implicits.global
import scala.concurrent.Future
import scala.concurrent.TimeoutException
import scala.concurrent.duration.Duration
import scala.io.Source

object FutureTest {
  
  def readFile(file: String): StringBuilder = {
    val ret = new StringBuilder
    
    Source.fromFile(file).getLines() foreach { line =>
      ret ++= (line + "\r\n")
    }
    
    ret
  }
  
  def main(args: Array[String]) {
    
    println("start")
    
    val time = System.currentTimeMillis()
   
    val future1 = Future { readFile("ufo_awesome_1.tsv") }
    val future2 = Future { readFile("ufo_awesome_2.tsv") }
    
    val result = Await.result(Future.sequence(Seq(future1, future2)), Duration.Inf)
    
    println(s"end and cost: ${System.currentTimeMillis() - time} ms")
  }
}

使用 Future 將 readFile 工作包裝起來,在 val future1 = Future { readFile("ufo_awesome_1.tsv") } 會產生一個 Thread 來處理,並且立即執行下一行的工作。最後使用 Await.result 取得結果,或者也可以使用 Await.ready。

如果需要等待多個 Future 的執行結果,先將需要等待的 Future,組成一個 Seq,再使用 Future.sequence 組合後回傳單一個 Future後,再使用 Await 等待執行的結果。

如果移除 val result = Await.result(Future.sequence(Seq(future1, future2)), Duration.Inf) 會發現主程式一下子就執行完畢。

Callback

onSuccess

顧名思義就是當 Future 包裝的工作執行成功時,會執行的工作。

eg:

package com.example

import scala.concurrent.Await
import scala.concurrent.ExecutionContext.Implicits.global
import scala.concurrent.Future
import scala.concurrent.TimeoutException
import scala.concurrent.duration.Duration
import scala.io.Source

object FutureTest {
  
  def readFile(file: String): StringBuilder = {
    val ret = new StringBuilder
    
    Source.fromFile(file).getLines() foreach { line =>
      ret ++= (line + "\r\n")
    }
    
    ret
  }
  
  def main(args: Array[String]) {
    
    println("start")
    
    val time = System.currentTimeMillis()
    
    println(s"${System.currentTimeMillis()} - create future")
    val future = Future { readFile("ufo_awesome_1.tsv"); println(s"${System.currentTimeMillis()} - read complete") }
    
    println(s"${System.currentTimeMillis()} - register onSuccess")
    future onSuccess {
      case sb => println(s"${System.currentTimeMillis()} - success")
    }
    
    println(s"${System.currentTimeMillis()} - await")
    
    val result = Await.result(future, Duration.Inf)
    
    println(s"end and cost: ${System.currentTimeMillis() - time} ms")
  }
}

結果:

start
1436100618543 - create future
1436100618816 - register onSuccess
1436100618818 - await
1436100620040 - read complete
end and cost: 1502 ms
1436100620042 - success

注意當宣告完 onSuccess 時,主程式並不會 Future 執行結束,而是往下繼續,一直到 Future 的工作完成後,才會執行 onSuccess。

onFailure

當 Future 內的工作,有發生 Exception or Error 時 (也就是有 Throwable )。 onFailure 並不會做 catch 的動作。這一點要特別注意

eg:

package com.example

import scala.concurrent.Await
import scala.concurrent.ExecutionContext.Implicits.global
import scala.concurrent.Future
import scala.concurrent.TimeoutException
import scala.concurrent.duration.Duration
import scala.io.Source
import scala.util.control.NonFatal

object FutureTest {
  
  def readFile(file: String): StringBuilder = {
    val ret = new StringBuilder
    
    Source.fromFile(file).getLines() foreach { line =>
      ret ++= (line + "\r\n")
    }
    
    ret
  }
  
  def main(args: Array[String]) {
    
    println("start")
    
    val time = System.currentTimeMillis()    
    
    println(s"${System.currentTimeMillis()} - create future")
    
    /* ufo_awesome_3.tsv 不存在*/
    val future = Future { readFile("ufo_awesome_3.tsv"); println(s"${System.currentTimeMillis()} - read complete") }
    
    println(s"${System.currentTimeMillis()} - register onSuccess")
    future onSuccess {
      case sb => println(s"${System.currentTimeMillis()} - success")
    }
    
    println(s"${System.currentTimeMillis()} - register onFailure")
    future onFailure {
      case ex: Exception => println(s"${System.currentTimeMillis()} - failure")
    }
    
    println(s"${System.currentTimeMillis()} - await")
    
    val result = Await.result(future, Duration.Inf)
    
    println(s"end and cost: ${System.currentTimeMillis() - time} ms")
  }
}

結果:

start
1436102289048 - create future
1436102289345 - register onSuccess
1436102289350 - register onFailure
1436102289351 - failure
1436102289352 - await
Exception in thread "main" java.io.FileNotFoundException: ufo_awesome_3.tsv (No such file or directory)
    at java.io.FileInputStream.open0(Native Method)
    at java.io.FileInputStream.open(FileInputStream.java:195)
    at java.io.FileInputStream.<init>(FileInputStream.java:138)
    at scala.io.Source$.fromFile(Source.scala:91)
    at scala.io.Source$.fromFile(Source.scala:76)
    at scala.io.Source$.fromFile(Source.scala:54)
    at com.example.FutureTest$.readFile(FutureTest.scala:19)
    at com.example.FutureTest$$anonfun$1.apply$mcV$sp(FutureTest.scala:44)
    at com.example.FutureTest$$anonfun$1.apply(FutureTest.scala:44)
    at com.example.FutureTest$$anonfun$1.apply(FutureTest.scala:44)
    at scala.concurrent.impl.Future$PromiseCompletingRunnable.liftedTree1$1(Future.scala:24)
    at scala.concurrent.impl.Future$PromiseCompletingRunnable.run(Future.scala:24)
    at scala.concurrent.impl.ExecutionContextImpl$AdaptedForkJoinTask.exec(ExecutionContextImpl.scala:121)
    at scala.concurrent.forkjoin.ForkJoinTask.doExec(ForkJoinTask.java:260)
    at scala.concurrent.forkjoin.ForkJoinPool$WorkQueue.runTask(ForkJoinPool.java:1339)
    at scala.concurrent.forkjoin.ForkJoinPool.runWorker(ForkJoinPool.java:1979)
    at scala.concurrent.forkjoin.ForkJoinWorkerThread.run(ForkJoinWorkerThread.java:107)

onComplete

當 Future 內的工作執行完畢,不論成功或失敗。

eg:

package com.example

import scala.concurrent.Await
import scala.concurrent.ExecutionContext.Implicits.global
import scala.concurrent.Future
import scala.concurrent.TimeoutException
import scala.concurrent.duration.Duration
import scala.io.Source
import scala.util.control.NonFatal
import scala.util.Success
import scala.util.Failure

object FutureTest {
  
  def readFile(file: String): StringBuilder = {
    val ret = new StringBuilder
    
    Source.fromFile(file).getLines() foreach { line =>
      ret ++= (line + "\r\n")
    }
    
    ret
  }
  
  def main(args: Array[String]) {
    
    println("start")
    
    val time = System.currentTimeMillis()

    println(s"${System.currentTimeMillis()} - create future")
    
    /* ufo_awesome_3.tsv 不存在*/
    val future = Future { readFile("ufo_awesome_3.tsv"); println(s"${System.currentTimeMillis()} - read complete") }
        
    println(s"${System.currentTimeMillis()} - register onComplete")
    future onComplete {
      case Success(sb) => println(s"${System.currentTimeMillis()} - onComplete - success")
      case Failure(error) => println(s"${System.currentTimeMillis()} - onComplete - failure ${error.toString()}")
    }
    
    println(s"${System.currentTimeMillis()} - await")
    
    val result = Await.result(future, Duration.Inf)
    
    println(s"end and cost: ${System.currentTimeMillis() - time} ms")
  }
}

結果:

start
1436105851821 - create future
1436105852172 - register onComplete
1436105852175 - await
1436105852177 - onComplete - failure java.io.FileNotFoundException: ufo_awesome_3.tsv (No such file or directory)
Exception in thread "main" java.io.FileNotFoundException: ufo_awesome_3.tsv (No such file or directory)
    at java.io.FileInputStream.open0(Native Method)
    at java.io.FileInputStream.open(FileInputStream.java:195)
    at java.io.FileInputStream.<init>(FileInputStream.java:138)
    at scala.io.Source$.fromFile(Source.scala:91)
    at scala.io.Source$.fromFile(Source.scala:76)
    at scala.io.Source$.fromFile(Source.scala:54)
    at com.example.FutureTest$.readFile(FutureTest.scala:21)
    at com.example.FutureTest$$anonfun$1.apply$mcV$sp(FutureTest.scala:46)
    at com.example.FutureTest$$anonfun$1.apply(FutureTest.scala:46)
    at com.example.FutureTest$$anonfun$1.apply(FutureTest.scala:46)
    at scala.concurrent.impl.Future$PromiseCompletingRunnable.liftedTree1$1(Future.scala:24)
    at scala.concurrent.impl.Future$PromiseCompletingRunnable.run(Future.scala:24)
    at scala.concurrent.impl.ExecutionContextImpl$AdaptedForkJoinTask.exec(ExecutionContextImpl.scala:121)
    at scala.concurrent.forkjoin.ForkJoinTask.doExec(ForkJoinTask.java:260)
    at scala.concurrent.forkjoin.ForkJoinPool$WorkQueue.runTask(ForkJoinPool.java:1339)
    at scala.concurrent.forkjoin.ForkJoinPool.runWorker(ForkJoinPool.java:1979)
    at scala.concurrent.forkjoin.ForkJoinWorkerThread.run(ForkJoinWorkerThread.java:107)

多個 Callback

一個 Future 允許有多個 onSuccess, onFailure, 及 onComplete 。執行的順序不一定會依照程式碼的順序。

eg:

package com.example

import scala.concurrent.Await
import scala.concurrent.ExecutionContext.Implicits.global
import scala.concurrent.Future
import scala.concurrent.TimeoutException
import scala.concurrent.duration.Duration
import scala.io.Source
import scala.util.control.NonFatal
import scala.util.Success
import scala.util.Failure

/**
 * @author kigi
 */
object FutureTest {
  
  def readFile(file: String): StringBuilder = {
    val ret = new StringBuilder
    
    Source.fromFile(file).getLines() foreach { line =>
      ret ++= (line + "\r\n")
    }
    
    ret
  }
  
  def main(args: Array[String]) {
    
    println("start")
    
    val time = System.currentTimeMillis()

    /*
    val future1 = Future { readFile("ufo_awesome_1.tsv") }
    val future2 = Future { readFile("ufo_awesome_2.tsv") }
    
    val result = Await.result(Future.sequence(Seq(future1, future2)), Duration.Inf)
    */
    
    
    println(s"${System.currentTimeMillis()} - create future")
    //val future = Future { readFile("ufo_awesome_1.tsv"); println(s"${System.currentTimeMillis()} - read complete") }
    
    /* ufo_awesome_3.tsv 不存在*/
    val future = Future { readFile("ufo_awesome_3.tsv"); println(s"${System.currentTimeMillis()} - read complete") }
    
    
    println(s"${System.currentTimeMillis()} - register onSuccess")
    future onSuccess {
      case sb => println(s"${System.currentTimeMillis()} - success")
    }
    
    println(s"${System.currentTimeMillis()} - register onFailure")
    future onFailure {
      case ex: Exception => println(s"${System.currentTimeMillis()} - failure")
    }
    
    println(s"${System.currentTimeMillis()} - register onComplete")
    future onComplete {
      case Success(sb) => println(s"${System.currentTimeMillis()} - onComplete - success")
      case Failure(error) => println(s"${System.currentTimeMillis()} - onComplete - failure ${error.toString()}")
    }
    
    println(s"${System.currentTimeMillis()} - await")
    
    val result = Await.result(future, Duration.Inf)
    
    println(s"end and cost: ${System.currentTimeMillis() - time} ms")
  }
}

結果:

start
1436105970847 - create future
1436105971148 - register onSuccess
1436105971151 - register onFailure
1436105971153 - register onComplete
1436105971154 - failure
1436105971155 - await
1436105971155 - onComplete - failure java.io.FileNotFoundException: ufo_awesome_3.tsv (No such file or directory)
Exception in thread "main" java.io.FileNotFoundException: ufo_awesome_3.tsv (No such file or directory)
    at java.io.FileInputStream.open0(Native Method)
    at java.io.FileInputStream.open(FileInputStream.java:195)
    at java.io.FileInputStream.<init>(FileInputStream.java:138)
    at scala.io.Source$.fromFile(Source.scala:91)
    at scala.io.Source$.fromFile(Source.scala:76)
    at scala.io.Source$.fromFile(Source.scala:54)
    at com.example.FutureTest$.readFile(FutureTest.scala:21)
    at com.example.FutureTest$$anonfun$1.apply$mcV$sp(FutureTest.scala:46)
    at com.example.FutureTest$$anonfun$1.apply(FutureTest.scala:46)
    at com.example.FutureTest$$anonfun$1.apply(FutureTest.scala:46)
    at scala.concurrent.impl.Future$PromiseCompletingRunnable.liftedTree1$1(Future.scala:24)
    at scala.concurrent.impl.Future$PromiseCompletingRunnable.run(Future.scala:24)
    at scala.concurrent.impl.ExecutionContextImpl$AdaptedForkJoinTask.exec(ExecutionContextImpl.scala:121)
    at scala.concurrent.forkjoin.ForkJoinTask.doExec(ForkJoinTask.java:260)
    at scala.concurrent.forkjoin.ForkJoinPool$WorkQueue.runTask(ForkJoinPool.java:1339)
    at scala.concurrent.forkjoin.ForkJoinPool.runWorker(ForkJoinPool.java:1979)
    at scala.concurrent.forkjoin.ForkJoinWorkerThread.run(ForkJoinWorkerThread.java:107)

Map 及 flatMap

Future 也有支援 map 及 flatMap。也就是說可以利用 map 及 flatMap 來進一步做資料處理。

eg: 取出檔案每一行後,計算每一行的長度,最後加總。

package com.example

import scala.concurrent.Await
import scala.concurrent.ExecutionContext.Implicits.global
import scala.concurrent.Future
import scala.concurrent.TimeoutException
import scala.concurrent.duration.Duration
import scala.io.Source
import scala.util.control.NonFatal
import scala.util.Success
import scala.util.Failure

object FutureTest {
  
  def readFile(file: String): StringBuilder = {
    val ret = new StringBuilder
    
    Source.fromFile(file).getLines() foreach { line =>
      ret ++= (line + "\r\n")
    }
    
    ret
  }
  
  def main(args: Array[String]) {
    
    println("start")
    
    val time = System.currentTimeMillis()
 
    /* Map Start */
    
    val future1 = Future { Source.fromFile("ufo_awesome_1.tsv").getLines().toSeq }
    
    val future2 = future1 map { seq => 
      seq.map { _.length }
    }
    
    val result = Await.result(future2, Duration.Inf)
    println(s"total: ${result.reduce( _ + _)}")
    /* Map End */
    println(s"end and cost: ${System.currentTimeMillis() - time} ms")
  }
}

結果:

start
total: 75281071
end and cost: 1161 ms

eg: 結合兩個檔案的內容

package com.example

import scala.concurrent.Await
import scala.concurrent.ExecutionContext.Implicits.global
import scala.concurrent.Future
import scala.concurrent.TimeoutException
import scala.concurrent.duration.Duration
import scala.io.Source
import scala.util.control.NonFatal
import scala.util.Success
import scala.util.Failure

object FutureTest {
  
  def readFile(file: String): StringBuilder = {
    val ret = new StringBuilder
    
    Source.fromFile(file).getLines() foreach { line =>
      ret ++= (line + "\r\n")
    }
    
    ret
  }
  
  def main(args: Array[String]) {
    
    println("start")
    
    val time = System.currentTimeMillis()    
    
    /* flatMap (for) start */
    
    val future1 = Future { readFile("ufo_awesome_1.tsv") }
    val future2 = Future { readFile("ufo_awesome_2.tsv") }
    
    val future3 = for (sb1 <- future1; sb2 <- future2) yield {
      sb1.toString + "\r\n" + sb2.toString
    }
   
    val result = Await.result(future3, Duration.Inf)
    println(s"total: ${result.length()}")
    
    /* flatMap (for) end */
    
    
    println(s"end and cost: ${System.currentTimeMillis() - time} ms")
  }
}

Scala Error Handle (Session 8)

Scala Error Handle

在 Function Language 中,Exception 是一種 Side Effect。在實際的環境中,只要跟 I/O 相關的,都會需要處理 Exception。Scala 除了保留原本 Java 的 try-catch-finally的機制外,提供下列三種方式來處理 Exception,再結合 Option 的方式,讓程式更可以專注在資料處理上。

Java: try - catch - finally

一般寫法:

try {
  ...
} catch {
    case ex: Exception =>
      ...
} finally {
  ...
}

千萬不要這麼寫:

try {
  ...
} catch {
  case _ =>
    ...
} finally {
 ...
}

或

try {
  ...
} catch {
  case _: Throwable =>
    ...
} finally {
  ...
}

偷懶的寫法:使用 NonFatal

import scala.util.control.NonFatal

try {
  ...
} catch {
  case NonFatal(_) =>
    ...
} finally {
  ...
}

Q: 為什麼不能使用:case _ => or case _: Throwable => ?

A: Throwable 有兩個 subclass: Exception 及 Error,一般在 Java 我們都是處理 Exception。Error 通常都是 JVM 發生重大錯誤時發出,如: OutOfMemoryError;此時應該是讓 JVM 中止執行,而不是繼續執行。

NonFatal 不會處理以下錯誤:

  • VirtualMachineError (包括 OutOfMemoryError and other fatal errors)
  • ThreadDeath
  • InterruptedException
  • LinkageError
  • ControlThrowable

Try

Try 與 Option 相似,本身有兩個 subclass: Success 及 Failure。當沒有發生 Exception 時,會回傳 Success 否則回傳 Failure。

舉例:

scala> import scala.util.Try
import scala.util.Try
scala> def parseInt(value: String) = Try { value.toInt }
parseInt: (value: String)scala.util.Try[Int]

Try 常用的幾個 Function:

  • map
scala> val t1 = parseInt("1000") map { _ * 2 }
t1: scala.util.Try[Int] = Success(2000)

scala> for (t1 <- parseInt("1000")) yield t1
res0: scala.util.Try[Int] = Success(1000)


scala> val t2 = parseInt("abc") map { _ * 2 }
t2: scala.util.Try[Int] = Failure(java.lang.NumberFormatException: For input string: "abc")

scala> for (t2 <- parseInt("abc")) yield t2
res1: scala.util.Try[Int] = Failure(java.lang.NumberFormatException: For input string: "abc")
  • recover
scala> import scala.util.control.NonFatal
import scala.util.control.NonFatal

scala> t1 recover { case NonFatal(_) => -1 }
res5: scala.util.Try[Int] = Success(2000)

scala> t2 recover { case NonFatal(_) => -1 }
res6: scala.util.Try[Int] = Success(-1)
  • toOption
scala> t1.toOption
res7: Option[Int] = Some(2000)

scala> t2.toOption
res8: Option[Int] = None
  • getOrElse
scala> t1.getOrElse(-1)
res9: Int = 2000

scala> t2.getOrElse(-1)
res10: Int = -1
  • 註1: Try 使用 NonFatal 來處理 Exception。
  • 註2: Option 及 Try 都是 ADT (Algebraic Data Type)

Catch

Catch 是用來處理 catch 及 finally。搭配 Option 及 Either 來處理 Exception。

scala> import scala.util.control.Exception._
import scala.util.control.Exception._

scala> def parseInt(value: String) = nonFatalCatch[Int] opt { value.toInt }
parseInt: (value: String)Option[Int]

scala> def parseInt(value: String) = nonFatalCatch[Int] either { value.toInt }
parseInt: (value: String)scala.util.Either[Throwable,Int]

scala> def parseInt(value: String) = nonFatalCatch[Int] andFinally { println("finally") } opt { value.toInt }
parseInt: (value: String)Option[Int]

scala> def parseInt(value: String) = nonFatalCatch[Int] andFinally { println("finally") } opt { println("begin"); value.toInt }
parseInt: (value: String)Option[Int]

scala> parseInt("abc")
begin
finally
res2: Option[Int] = None

scala> parseInt("123")
begin
finally
res3: Option[Int] = Some(123)

scala> def parseInt(value: String) = catching(classOf[Exception]) opt { value.toInt }
parseInt: (value: String)Option[Int]

scala> parseInt("456")
res5: Option[Int] = Some(456)

Either

Either 可以讓 Fuction 達到回傳不同型別資料效果。Either 有兩個 subclass: Right 及 Left。可以使用 match-case 來確認是回傳 Right or Left;進而了解是成功或失敗。

scala> def parseInt(value: String) = try { Right(value.toInt) } catch { case ex: Exception => Left(value) } 

parseInt: (value: String)Product with Serializable with scala.util.Either[String,Int]

scala> parseInt("123") match {
     | case Right(v) => println(s"success ${v}")
     | case Left(s) => println(s"failure ${s}")
     | }
success 123

scala> parseInt("abc") match {
     | case Right(v) => println(s"success ${v}")
     | case Left(s) => println(s"failure ${s}")
     | }
failure abc

Map & Reduce in Scala Collection (Session 7)

Map & Reduce in Scala Collection

What's Map & Reudce

Map 是指將 collection 每個元素,經過指定的 function 處理,產生新的值 (也可以是另一個 Collection)

Map 的特性:

  • Collection 的每一個元素都是獨立被處理,也就是說跟 collection 的其他元素無關。
  • 經 Map 程序處理後,最後回傳的 collection 資料型別不變。比如說: List 經過 map 程序後,回傳值依然是 List,但其中的元素資料型別視處理的 function 而有所不同。
  • 原本的 collection 內的元素值都不會被改變,最後是回傳一個新的 collection。

延伸: flatMap

Reduce 是指將 collection 的元素做歸納處理後,回傳一個跟元素資料型別相同或者是supertype 的值。

Reduce 特性:

  • 指定的歸納 function,第一次會處理兩個元素值。
  • 每次處理後的結果,再跟下一個元素,再做一次處理,以此類推,直到所有的元素都被處理過。
  • 處理的過程,不見得會依照預期的順序,因此指定的 function 如果沒有結合律的特性,也許結果會不如預期。
  • 回傳最終處理的結果,且資料型別是跟元素相同或者是 supertype。

註:結合律是 (x + y) + z = x + (y + z)。像四則運算的 \(+\) 與 \(\times\) 有結合律,但 \(-\) 與 \(\div\) 沒有。

延伸:reduceLeft & reduceRight

舉例:輸入一個字串的 List,計算其中字串長度的總和。

scala> val lst = List("ABC", "Hello, World!!!", "Apple", "Microsoft")
lst: List[String] = List(ABC, Hello, World!!!, Apple, Microsoft)

scala> val lenLst = lst map { _.length }
lenLst: List[Int] = List(3, 15, 5, 9)

scala> val total = lenLst reduce { _ + _ }
total: Int = 32

或

scala> val lst = List("ABC", "Hello, World!!!", "Apple", "Microsoft")
lst: List[String] = List(ABC, Hello, World!!!, Apple, Microsoft)

scala> lst map { _.length } reduce { _ + _ }
res7: Int = 32

Function Languge Map-Reduce 的概念,後來被應用到 Hadoop 的 Map-Reduce。

Map, flatMap & for-yield

Scala 的 for-yield 處理,實際上是轉成 flatMap 與 map 處理。

舉例:

一層迴圈

scala> for (i <- 1 to 9) yield i + 1
res5: scala.collection.immutable.IndexedSeq[Int] = Vector(2, 3, 4, 5, 6, 7, 8, 9, 10)

scala> (1 to 9) map { _ + 1 }
res6: scala.collection.immutable.IndexedSeq[Int] = Vector(2, 3, 4, 5, 6, 7, 8, 9, 10)

二層迴圈

scala> for (i <- 1 to 9; j <- 1 to i) yield i * j
res7: scala.collection.immutable.IndexedSeq[Int] = Vector(1, 2, 4, 3, 6, 9, 4, 8, 12, 16, 5, 10, 15, 20, 25, 6, 12, 18, 24, 30, 36, 7, 14, 21, 28, 35, 42, 49, 8, 16, 24, 32, 40, 48, 56, 64, 9, 18, 27, 36, 45, 54, 63, 72, 81)

scala> (1 to 9) flatMap { i => (1 to i) map { i * _ } }
res8: scala.collection.immutable.IndexedSeq[Int] = Vector(1, 2, 4, 3, 6, 9, 4, 8, 12, 16, 5, 10, 15, 20, 25, 6, 12, 18, 24, 30, 36, 7, 14, 21, 28, 35, 42, 49, 8, 16, 24, 32, 40, 48, 56, 64, 9, 18, 27, 36, 45, 54, 63, 72, 81)

Option 處理

單個:

scala> val s1 = Some("s1")
s1: Some[String] = Some(s1)

scala> for (s <- s1) yield s + s
res11: Option[String] = Some(s1s1)

scala> s1 map { s => s + s }
res13: Option[String] = Some(s1s1)

多個:

scala> val s1 = Option("s1")
s1: Option[String] = Some(s1)

scala> val s2 = None
s2: None.type = None

scala> for (a <- s1; b <- s2) yield (a, b)
res15: Option[(String, Nothing)] = None

scala> s1 flatMap { a => s2 map { b => (a, b) } }
res17: Option[(String, Nothing)] = None

scala> for (a <- s1; b <- s2) yield a + b
res16: Option[String] = None

scala> s1 flatMap { a => s2 map { b => a + b } }
res18: Option[String] = None

flatMap or for-yield 很適合處理 AND 的情況

舉例:每個 Store 都有一個歸屬的 Store,目前要查詢歸屬的 Store 名稱。

scala> case class Store(id: Int, name: String, belong: Int)
defined class Store

scala> val map = Map(0 -> Store(0, "3C", 0))
map: scala.collection.immutable.Map[Int,Store] = Map(0 -> Store(0,3C,0))

if-else 的版本

val s1 = map.get(0)

scala> if (s1.isDefined) {
     | val s2 = map.get(s1.get.belong)
     | if (s2.isDefined) Some(s2.get.name)
     | else None
     | } else None
res6: Option[String] = Some(3C)

for-yield 版本

scala> for (s1 <- map.get(0); s2 <- map.get(s1.belong)) yield s2.name
res0: Option[String] = Some(3C)

Collection 相關函數

fold, foldLeft, foldRight

fold 與 reduce 很類似,fold 多了可以指定 初始值

scala> val lst = List(1, 2, 3, 4, 5, 6, 7, 8, 9)
lst: List[Int] = List(1, 2, 3, 4, 5, 6, 7, 8, 9)

scala> lst reduce { _ + _ }
res20: Int = 45

scala> lst.fold(100) { _ + _ }
res25: Int = 145

scan, scanLeft, scanRight

scan 可以指定 初始值,第一個元素與初始值處理的結果,再與第二個元素處理,以此類推,最後回傳原本 collection 的資料型別,初始值當作第一個元素。概念跟 map 有點像,map 是獨立處理每個元素,scan 會與上一次處理的結果有關。

scala> val lst = List(1, 2, 3)
lst: List[Int] = List(1, 2, 3)

scala> lst map { _ + 1 }
res26: List[Int] = List(2, 3, 4)

scala> lst.scan(10) { (a, b) => println(a, b); a + b  }
(10,1)
(11,2)
(13,3)
res30: List[Int] = List(10, 11, 13, 16)

groupBy

groupBy 利用指定的 function 回傳值當作 key,自動依 key 分群,回傳一個 Map,Map 內的 value 資料型別,會與原來的 collection 相同。

scala> val lst = List(1, 2, 3, 4, 5, 6, 7, 8, 9)
lst: List[Int] = List(1, 2, 3, 4, 5, 6, 7, 8, 9)

scala> lst groupBy { _ % 3 }
res31: scala.collection.immutable.Map[Int,List[Int]] = Map(2 -> List(2, 5, 8), 1 -> List(1, 4, 7), 0 -> List(3, 6, 9))

scala> val arr = Array(1, 2, 3, 4, 5, 6, 7, 8, 9)
arr: Array[Int] = Array(1, 2, 3, 4, 5, 6, 7, 8, 9)

scala> arr groupBy { _ % 3 }
res32: scala.collection.immutable.Map[Int,Array[Int]] = Map(2 -> Array(2, 5, 8), 1 -> Array(1, 4, 7), 0 -> Array(3, 6, 9))

Zip

將兩個 collection 中的元素,一對一的方式組成兩個元素的 tuple。行為很類似 拉鏈。

scala> val lst1 = List("a", "b", "c", "d")
lst1: List[String] = List(a, b, c, d)

scala> val lst2 = List(1, 2, 3)
lst2: List[Int] = List(1, 2, 3)

scala> lst1 zip lst2
res0: List[(String, Int)] = List((a,1), (b,2), (c,3))

scala> lst1.zipWithIndex
res2: List[(String, Int)] = List((a,0), (b,1), (c,2), (d,3))

附錄

Scala Variance & Bounds

Varince

Variance 主要是在討論

If \(T_1\) is subclass of \(T\), is Container[\(T_1\)] is subclass of Container[\(T\)] ?

Variance Meaning Scala notation
covariant C[\(T_1\)] is subclass of C[\(T\)] [+T]
contravariant C[\(T\)] is subclass of C[\(T_1\)] [-T]
invariant C[\(T_1\)] and C[\(T\)] are not related [T]

舉例:Covariant

scala> class Covariant[+A]
defined class Covariant

scala> val cv: Covariant[AnyRef] = new Covariant[String]
cv: Covariant[AnyRef] = Covariant@1fc2b765

scala> val cv: Covariant[String] = new Covariant[AnyRef]
<console>:8: error: type mismatch;
 found   : Covariant[AnyRef]
 required: Covariant[String]
       val cv: Covariant[String] = new Covariant[AnyRef]

舉例:Contravariant

scala> class Contravariant[-A]
defined class Contravariant

scala> val cv: Contravariant[String] = new Contravariant[AnyRef]
cv: Contravariant[String] = Contravariant@7bc1a03d

scala> val cv: Contravariant[AnyRef] = new Contravariant[String]
<console>:8: error: type mismatch;
 found   : Contravariant[String]
 required: Contravariant[AnyRef]
       val cv: Contravariant[AnyRef] = new Contravariant[String]

範例來自:Twitter's Scala School - Type & polymorphism basics

記憶方法:

\[ \forall T_1 \in +T, \text{then }T_1 \text{ is subclass of } T \]

\[ \forall T_1 \in -T, \text{then }T_1 \text{ is superclass of } T \]

\[ \begin{equation} -T \\ \uparrow\\ T \\ \uparrow \\ +T \end{equation} \]

ContraVariant 案例:Function1[-T, +R]

eg:

scala> class Test[+A] { def test(a: A): String = a.toString }
<console>:7: error: covariant type A occurs in contravariant position in type A of value a
       class Test[+A] { def test(a: A): String = a.toString }

fix:

scala> class Test[+A] { def test[B >: A](b: B): String = b.toString }
defined class Test

Bounds

Lower Type Bound

A >: B => A is superclass of B. B is the lower bound.

Upper Type Bound

A <: B => A is subclass of B. B is the upper bound.

參考:

Case Class and Pattern Match (Session 6)

Case Class and Pattern Match

Case Class

宣告:

case class Person(name: String, age: Int)

Compiler 後,會有 Person.class 及 Person$.class

scalap -private Person:

case class Person(name: scala.Predef.String, age: scala.Int) extends scala.AnyRef with scala.Product with scala.Serializable {
  val name: scala.Predef.String = { /* compiled code */ }
  val age: scala.Int = { /* compiled code */ }
  def copy(name: scala.Predef.String, age: scala.Int): Person = { /* compiled code */ }
  override def productPrefix: java.lang.String = { /* compiled code */ }
  def productArity: scala.Int = { /* compiled code */ }
  def productElement(x$1: scala.Int): scala.Any = { /* compiled code */ }
  override def productIterator: scala.collection.Iterator[scala.Any] = { /* compiled code */ }
  def canEqual(x$1: scala.Any): scala.Boolean = { /* compiled code */ }
  override def hashCode(): scala.Int = { /* compiled code */ }
  override def toString(): java.lang.String = { /* compiled code */ }
  override def equals(x$1: scala.Any): scala.Boolean = { /* compiled code */ }
}
object Person extends scala.runtime.AbstractFunction2[scala.Predef.String, scala.Int, Person] with scala.Serializable {
  def this() = { /* compiled code */ }
  final override def toString(): java.lang.String = { /* compiled code */ }
  def apply(name: scala.Predef.String, age: scala.Int): Person = { /* compiled code */ }
  def unapply(x$0: Person): scala.Option[scala.Tuple2[scala.Predef.String, scala.Int]] = { /* compiled code */ }
  private def readResolve(): java.lang.Object = { /* compiled code */ }
}

javap -p Person

Compiled from "Person.scala"
public class Person implements scala.Product,scala.Serializable {
  private final java.lang.String name;
  private final int age;
  public static scala.Option<scala.Tuple2<java.lang.String, java.lang.Object>> unapply(Person);
  public static Person apply(java.lang.String, int);
  public static scala.Function1<scala.Tuple2<java.lang.String, java.lang.Object>, Person> tupled();
  public static scala.Function1<java.lang.String, scala.Function1<java.lang.Object, Person>> curried();
  public java.lang.String name();
  public int age();
  public Person copy(java.lang.String, int);
  public java.lang.String copy$default$1();
  public int copy$default$2();
  public java.lang.String productPrefix();
  public int productArity();
  public java.lang.Object productElement(int);
  public scala.collection.Iterator<java.lang.Object> productIterator();
  public boolean canEqual(java.lang.Object);
  public int hashCode();
  public java.lang.String toString();
  public boolean equals(java.lang.Object);
  public Person(java.lang.String, int);
}

javap -p Person$

Compiled from "Person.scala"
public final class Person$ extends scala.runtime.AbstractFunction2<java.lang.String, java.lang.Object, Person> implements scala.Serializable {
  public static final Person$ MODULE$;
  public static {};
  public final java.lang.String toString();
  public Person apply(java.lang.String, int);
  public scala.Option<scala.Tuple2<java.lang.String, java.lang.Object>> unapply(Person);
  private java.lang.Object readResolve();
  public java.lang.Object apply(java.lang.Object, java.lang.Object);
  private Person$();
}

需注意的重點:

  • 由 scalap 及 javap 來看,在宣告 case class 後,會產生兩個 class。
  • 當我們在產生 case class 時,是呼叫 object (singeton) 的 apply function.
  • case class contructor 的參數,會自動變成 read only 的 member data.
scala> case class Person(name: String, age: Int)
defined class Person

scala> val p1 = Person("abc", 10)
p1: Person = Person(abc,10)

與 Pattern Match 有直接關係的 function: apply and unapply. 以 Person 為例:

def apply(name: scala.Predef.String, age: scala.Int): Person = { /* compiled code */ }

def unapply(x$0: Person): scala.Option[scala.Tuple2[scala.Predef.String, scala.Int]] = { /* compiled code */ }

Pattern Match

上例 Person 的 Pattern Match 範例:

scala> p1 match {
     | case Person(n, a) => println(n, a)
     | case _ => println("not match")
     | }
(abc,10)

Extractor

一個 class or object 有以下之一的 function 時,就可以稱作 Extractor。

  • unapply
  • unapplySeq

這類的 function ,稱為 extraction;反之,apply 則稱為 injection。

Extractor 只要有實作 unapply or unapplySeq 即可;但如果 Extractor 沒有實作 apply, 則 unapply 回傳型別必須是 Boolean。

unapplySeq 是用在 variable argument 也就是類似 func(lst: String*)。

Extractor 可以是 object or class。class 可以存當時的條件,但 object 則沒有這樣的效果 (因為 object 是 singleton,無法存每次不同的比對條件)

Pattern, Extractor, and Binding

Extractor only with extraction and binding

package com.example

object EMail {

  /* Injection */
  def apply(u: String, d: String) = s"${u}@${d}"

  /* Extraction */
  def unapply(s: String): Option[(String, String)] = {
    println("EMail.unapply")
    var parts = s.split("@")
    if (parts.length == 2) Some(parts(0), parts(1)) else None
  }
}

/* Extraction */
object UpperCase {
  def unapply(s: String): Boolean = {
    println("UpperCase.unapply")
    s == s.toUpperCase()
  }
}

object PatternTest {

  def main(args: Array[String]) {
    "Test@test.com" match {
      case EMail(user @ UpperCase(), domain) => println(user, domain) /* 注意:UpperCase 後面一定要加 () (括號) */
      case _ => println("not match")
    }

    "TEST@test.com" match {
      case EMail(user @ UpperCase(), domain) => println(user, domain)
      case _ => println("not match")
    }
  }

}

執行結果:

EMail.unapply
UpperCase.unapply
not match
EMail.unapply
UpperCase.unapply
(TEST,test.com)

當在執行 pattern match 至 case EMail 時,會去呼叫 EMail.unapply(s: String) 看是否符合;當符合時,再呼叫 UpperCase.unapply(s: String)。

Test@test.com 結果是 not match, 因為在 UpperCase 是 false. TEST@test.com 則是 (TEST, test.com)

截自:Programming in Scala: A Comprehensive Step-by-Step Guide, 2nd Edition

Extractor with variable arguement

/* Extraction Only*/
class Between(val min: Int, val max: Int) {

  def unapplySeq(value: Int): Option[List[Int]] =
    if (min <= value && value <= max) Some(List(min, value, max))
    else None
}
    
object PatternTest {

  def main(args: Array[String]) {
     val between5and15 = new Between(5, 15)

    10 match {
      case between5and15(min, value, max) => println(value)
      case _ => println("not match")
    }

    20 match {
      case between5and15(min, value, max) => println(value)
      case _ => println("not match")
    }
  }
}

執行結果:

10
not match

因為 Between 的 unapplySeq 回傳是 List(min, value, max),所以比對的 pattern 就必須是 List 的 pattern,像 (min, value, max) or (_, value, max) or (min, _*)

Extractor with binding

class Between(val min: Int, val max: Int) {

  def unapplySeq(value: Int): Option[List[Int]] =
    if (min <= value && value <= max) Some(List(min, value, max))
    else None
}

object PatternTest {

  def main(args: Array[String]) {
  
    (50, 10) match {
      case (n @ between5and15(_*), _) => println("first match " + n)
      case (_, m @ between5and15(_*)) => println("second match " + m)
      case _ => println("not match")
    }
  }

}

執行結果:

second match 10

Extractor 用在 binding 時,要注意要附上比對的 pattern (ex: between5and15(_*)),如果沒寫對,會比對失敗。比如說:把 (_, m @ between5and15(_*)) 改成 case (_, m @ between5and15()), 雖然 m (m = 10) 在 5 ~ 15,但會比對失敗。

Pattern and Regex

Scala 的 Regex 有實作 unapplySeq, Regex 搭配 Pattern 非常好用。

object RegexTest {

  def main(args: Array[String]) {
    val digits = """(\d+)-(\d+)""".r

    "123-456" match {
      case digits(a, b) => println(a, b)
      case _ => println("not match")
    }

    "123456" match {
      case digits(a, b) => println(a, b)
      case _ => println("not match")
    }

    "abc-456" match {
      case digits(a, b) => println(a, b)
      case _ => println("not match")
    }
  }
}

執行結果:

(123,456)
not match
not match

因為 digits 有用到 group,所以 pattern 會是 digits(a, b)。如果把 val digits = """(\d+)-(\d+)""".r 改成 val digits = """\d+-\d+""".r 不使用 group 時,因為比對的 pattern 改變 (digits(a, b) -> digits()),所以上面的三個比對都會是 not match。需要將程式改成如下,才會正確

val digits = """\d+-\d+""".r
  
"123-456" match {
  case digits() => println("ok")
  case _ => println("not match")
}
  

所以使用 Regex 時,儘量用 group 的功能,在系統設計時,彈性會比較大。

Regex and Binding

val digits = """(\d+)-(\d+)-(\d+)""".r

("123-abc-789", "123-456-789") match {
  case (_ @ digits(a, _*), _) => println(a)
  case (_, _ @ digits(a, b, c)) => println(a, b, c)
  case _ => println("not match")
}

用 Binding 時,一樣要注意比對的 pattern,如: digits(a, _*), digits(a, b, c)

Case Class, Patch Match and Algebraic Data Type

sealed trait Tree

object Empty extends Tree
case class Leaf(value: Int) extends Tree
case class Node(left: Tree, right: Tree) extends Tree

object TreeTest {

 val depth: PartialFunction[Tree, Int] = {
    case Empty => 0
    case Leaf(value) => 1
    case Node(l, r) => 1 + Seq(depth(l), depth(r)).max
  }
  
  def max(tree: Tree): Int = tree match {
    case Empty => Int.MinValue
    case Leaf(value) => value
     case Node(l, r) => Seq(max(r), max(l)).max
  }
  
  def main(args: Array[String]) {
    
    val tree = Node(
          Node(
            Leaf(1),
            Node(Leaf(3), Leaf(4))
          ),
          Node(
              Node(Leaf(100), Node(Leaf(6), Leaf(7))),
              Leaf(2)
          )
        )
        
        
     println(depth(tree))
     
     println(max(tree))
  }
}

注意:使用 sealed 時,子類別都要與父類別放在同一個原始碼中,且如果在 pattern match 少比對一種子類別時,會出現警告。

範例修改自:

進階:

Wiki: Algebric Data Type

Scala Functional Language 簡介 (Session 5)

Scala Functional Language 簡介

Functional Language 其實很早就有了,只是 OOP 概念比較能讓人接受,因此 Functional Language 就被忽略。近來大數據需要做大量平行與分散式的運算,Functional Lanauge 才又被重視。

Functional Language 簡單來說,就是:

Treats computation as the evaluation of mathematical functions and avoids changing-state and mutable data (Side Effects)

截自 Wiki: Functional Lanauge

名詞解釋

Mathematical Functions

Mathematical Functions 簡單來說,就是兩個集合間的關係,且每一個輸入值,只會對應到一個輸出值。

最簡單的數學函數的表示式:

\[f: X \mapsto Y\]

比如說:Square

\[Square: Int \mapsto Int \] \[f(x) = x^2\]

比如 \(f(3) = 9\), \(f(-3) = 9\) ,每次計算 \(f(3)\) 一定都會是 9 不會變成其他值。

Side Effects

程式的函式有以下的行為時,就會稱該函式有 Side Effects。

  • Reassigning a variable (val v.s. var)
  • Modify a data structure in place (mutable v.s. immutable)
  • Setting a field on an object (change object state)
    • 這裏指的 object 是 OOP 的 Object 不是 Scala 的 object (singleton)
    • OOP 修改物件的值,在程式語言的術語:改變物件的狀態,如上說的 changing-state
  • Throwing an exception or halting with error
  • Printing to the console or reading user input (I/O)
  • Reading from or write to a file (I/O)
  • Drawing on the screen (I/O)

截自 Functional Language in Scala

就實際狀況來說,我們寫程式不可能不去碰 I/O。

Purely Functions

Purely functional functions (or expressions) have no side effects (memory or I/O).

截自 Wiki: Purely Function

Referential Transparency (RT)

An expression is said to be referentially transparent if it can be replaced with its value without changing the behavior of a program

截自 Wiki: Referential Transparency

簡單來說,程式碼中的變數,可以用此變數的值或運算式子來取代,而且不會改變輸出的結果。

舉例來說:String 是 immutable,當每次呼叫 reverse 時,都會回傳固定的值。

scala> val x = "Hello, World"
x: String = Hello, World

scala> val r1 = x.reverse
r1: String = dlroW ,olleH

scala> val r2 = x.reverse
r2: String = dlroW ,olleH

此時,可以將上述的 x 直接替換成 Hello, World,程式的結果都不會被改變。此特性,就是 Referential Transparency。如下:

scala> val r1 = "Hello, World".reverse
r1: String = dlroW ,olleH

scala> val r2 = "Hello, World".reverse
r2: String = dlroW ,olleH

另舉反例:StringBuilder 是 mutable,append 會修改 StringBuffer 內的值 (change object state)。

scala> val x = new StringBuilder("Hello")
x: StringBuilder = Hello

scala> val y = x.append(", World")
y: StringBuilder = Hello, World

scala> val r1 = y.toString
r1: String = Hello, World

scala> val r2 = y.toString
r2: String = Hello, World

當將 y 替換成 x.append(", World") 時:

scala> val r1 = x.append(", World").toString
r1: String = Hello, World

scala> val r2 = x.append(", World").toString
r2: String = Hello, World, World

此時 r1 及 r2 的值並不一致,這樣子就沒有 Referential Transparency 。

範例截自: Functional Language in Scala

為什麼 Referential Transparency 如此重要

當程式設計都符合 Referential Transparency 時,就代表程式可以分散在不同 Thread, CPU核心,甚至不同主機上處理(空間),而且不論什麼時候被處理(時間),都不會影響輸出的結果。

Funcational Language 程式設計的終極目標就是 Referential Transparency。

First-Class Function and High Order Function

First-Class Function

一個程式語言有 First-Class Function 特性,是指此程式語言將 Function 當作是一種資料型態。

在 Scala 中,有定義 Function 這個 class。如下:

scala> val max = (x: Int, y:Int) => if (x > y) x else y
max: (Int, Int) => Int = <function2>

scala> max(3, 4)
res5: Int = 4

High Order Function

Hight Order Function 是指 Function 其中一個參數的資料型別是 Function。比如 List 的 foreach。

scala> List(1, 2, 3, 4) foreach { x => println(x + x) }
2
4
6
8

Function Composition

數學的複合函數:

\[f: X \mapsto Y\]

\[g: Y \mapsto Z\]

\[ g \circ f: X \mapsto Z\]

\[ (g \circ f )(x) = g(f(x))\]

在 Scala 上的實作,有 compose 及 andThen

f andThen g 等同於 \( g \circ f \)

f compose g 等同於 \( f \circ g \)

eg:

scala> val f = (x: Int) => x * x
f: Int => Int = <function1>

scala> val g = (x: Int) => x + 1
g: Int => Int = <function1>

scala> val goff = f andThen g
goff: Int => Int = <function1>

scala> goff(10)
res10: Int = 101

scala> val fofg = f compose g
fofg: Int => Int = <function1>

scala> fofg(10)
res11: Int = 121

轉成 Function Class

一般會用 def 宣告 function;可以使用 _ 轉換成 Function Class。如下:

scala> def f(x: Int) = x * x
f: (x: Int)Int

scala> def g(x: Int) = x + 1
g: (x: Int)Int

scala> f andThen g
<console>:10: error: missing arguments for method f;
follow this method with `_' if you want to treat it as a partially applied function
              f andThen g
              ^
<console>:10: error: missing arguments for method g;
follow this method with `_' if you want to treat it as a partially applied function
              f andThen g
                        ^
                        
 scala> f _ andThen g _
res1: Int => Int = <function1>

Partially Applied Function

def sum(x: Int, y: Int, z: Int) = x + y + z
sum: (x: Int, y: Int, z: Int)Int

scala> val a = sum _
a: (Int, Int, Int) => Int = <function3>

scala> val b = sum(1, _: Int, 3)
b: Int => Int = <function1>

scala> b(2)
res1: Int = 6

Closure

A function object that captures free variables, and is said to be “closed” over the variables visible at the time it is created.

舉例:

scala> var more = 10
more: Int = 10

scala> val addMore = (x: Int) => x + more
addMore: Int => Int = <function1>

addMore 是一個 Closure. more 這個變數是 free variable. x 是 bounded variable.

Currying

假設有個 function 由兩個以上的集合對應到一個集合:

\[f: X \times Y \mapsto Z\]

比如說:

\[f(x, y) = \frac{y}{x}\]

我們可以定義一個 Curring Function :

\[h(x) = y \mapsto f(x, y)\]

\(h(x)\) 是一個 Function ,它的輸入值是 x ,回傳值是 Function 。

比如說:

\[h(2) = y \mapsto f(2, y)\]

這時候的 \( h(2) \) 是一個 Function:

\[ f(2, y) = \frac {y}{2} \]

此時,我們可以再定義一個 Function: \(g(y) \)

\[g(y) = h(2) = y \mapsto f(2, y)\]

也就是

\[g(y) = f(2, y) = \frac {y}{2}\]

在 Scala 的實作:

定義 \( f: X \times Y \mapsto Z \)

scala> def f(x: Int)(y: Int) = y / x
f: (x: Int)(y: Int)Int

scala> f(4)(2)
res7: Int = 0

scala> f(2)(4)
res8: Int = 2

定義 \( g(y) = h(2) = y \mapsto f(2, y) \) i.e. \[g(y) = f(2, y) = \frac {y}{2} \]

scala> val h = f(2) _
h: Int => Int = <function1>

當 \( y = 4 \) 時,

\[g(4) = f(2, 4) = \frac {4} {2} = 2\]

scala> h(4)
res9: Int = 2

範例截自 Wiki: Curring

另一種使用時機:

scala> def modN(n: Int)(x: Int) = ((x % n) == 0)
modN: (n: Int)(x: Int)Boolean

scala> val nums = List(1, 2, 3, 4, 5, 6, 7, 8)
nums: List[Int] = List(1, 2, 3, 4, 5, 6, 7, 8)

scala> nums filter { modN(2) }
res10: List[Int] = List(2, 4, 6, 8)

scala> nums filter { modN(3) }
res11: List[Int] = List(3, 6)

數學式對應:

\[modN: Int \times Int \mapsto Boolean\]

\[modN(n, x) \Rightarrow ((x \bmod n ) == 0)\]

\[mod2(x) = modN(2, x) \Rightarrow ((x \bmod 2) == 0)\]

\[mod3(x) = modN(3, x) \Rightarrow ((x \bmod 3) == 0)\]

範例截自:Scala Document: Currying

Scala Partial Function

一般定義 Function 都會去處理輸入值的所有情況。比如說:

def plusOne(x: Int) = x + 1

所有 Int 整數值,傳進 plusOne 都會被處理。

Partial Function 換言之就是只處理某些狀況下的值。

定義:

scala> val one: PartialFunction[Int, String] = { case 1 => "one" }
one: PartialFunction[Int,String] = <function1>

使用:如果輸入沒有要處理的值時,會出現 Exception。比如 1 有定義,但 2 沒有,所以輸入 1 沒問題,輸入 2 就會有 Exception。

scala> one(1)
res0: String = one

scala> one(2)
scala.MatchError: 2 (of class java.lang.Integer)
  at scala.PartialFunction$$anon$1.apply(PartialFunction.scala:253)
  at scala.PartialFunction$$anon$1.apply(PartialFunction.scala:251)
  at $anonfun$1.applyOrElse(<console>:7)
  at $anonfun$1.applyOrElse(<console>:7)
  at scala.runtime.AbstractPartialFunction.apply(AbstractPartialFunction.scala:36)
  ... 33 elided

查詢輸入值,是否已在處理的範圍內:

scala> one.isDefinedAt(1)
res2: Boolean = true

scala> one.isDefinedAt(2)
res3: Boolean = false

Composition of Partial Function

可以使用多個 Partial Function 組成一個複合函數。

scala> val two: PartialFunction[Int, String] = { case 2 => "two" }
two: PartialFunction[Int,String] = <function1>

scala> val three: PartialFunction[Int, String] = { case 3 => "three" }
three: PartialFunction[Int,String] = <function1>

scala> val wildcard: PartialFunction[Int, String] = { case _ => "something else" }
wildcard: PartialFunction[Int,String] = <function1>

scala> val partial = one orElse two orElse three orElse wildcard
partial: PartialFunction[Int,String] = <function1>

scala> partial(5)
res4: String = something else

scala> partial(3)
res5: String = three

scala> partial(2)
res6: String = two

scala> partial(1)
res7: String = one

scala> partial(0)
res8: String = something else

scala> partial.isDefinedAt(10)
res9: Boolean = true

scala> partial.isDefinedAt(1000)
res10: Boolean = true

範例截自:Twitter Scala School - Partial Function

總結

開始使用 Functional Lanague 時,思維需要做改變,程式設計時,以往用 OO 處理的設計,要轉換到是否可以切割成 Function 來處理,尤其是 Function 要符合數學函數或 Purly Function 的定義,Functional Language 程式的設計思維,會更倚重數學邏輯。

進階:

Scala Collection (Session 4)

Scala Collection

Scala Collection 功能比 Java 強大很多。在語法上也差異很大。因此在學習過程,建議直接依書上的範例做過一遍。

建議閱讀資料:

Array

Scala 有 Array 的 Class,語法上與 Java 差異很大。 eg:

Java String Array: String[] test = Strig[5];

Scala String Array: val test = Array.fill(5) { "" }

Q: Array 特性?!

Scala Array 是一組 mutable indexed 集合。

宣告:

scala> val arr1 = Array(1, 2, 3)
arr1: Array[Int] = Array(1, 2, 3)

scala> val arr2 = Array("a", "b", "c")
arr2: Array[String] = Array(a, b, c)

scala> val arr3 = Array.fill(3) { math.random }
arr3: Array[Double] = Array(0.6325626123459638, 0.7135533929240558, 0.6461315533714135)

scala> class Test
defined class Test

scala> val arrTest = Array.fill[Test](3) { null }
arrTest: Array[Test] = Array(null, null, null)

取值:

arr1(1)

Immutable v.s. Mutable

Scala Collection Class 分成 Immutable 及 Mutable。兩者主要差別是 Mutale 可以修改集合裏面的內容;但 Immutable 不行。使用類似 append 時,Immutable 的集合,會回傳一個新的集合,而非就現有的集合擴充,在使用時,要特別小心,以免造成記憶體浪費。

Mutable Collection Class 都會有 toXXXX 去轉成 Immutable Collection。

p.s. 在 Java 最常用的 immutable 是 String

Scala Collection Hierarchy
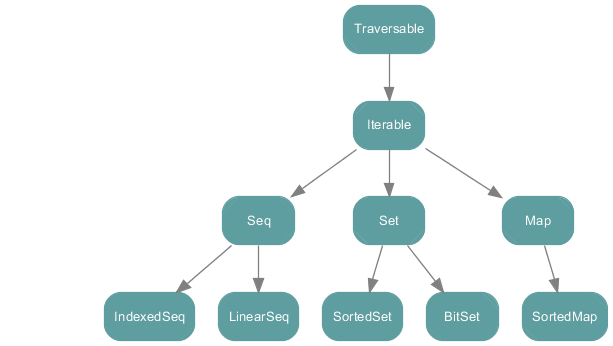
Scala Collection

Scala Immutable Collection

Scala Immutable Collection

Scala Mutable Collection

Scala Mutable Collection

效能問題

Scala 的 Collection 有很完整的繼承結構,在效能上,越底層的 Class 效能會越差。因此使用時,要確定好你需要的功能是什麼。如果只用到 Seq ,就不需要用到 List。

Immutable or Mutable

用那一個?

  • 基本上,如果宣告後,就不會再更動內容,就直接用 Immutable
  • 需要用程式處理初始化 (如:從 DB 讀資料,組出 List);這類 case,一開始會用 mutable,但做完初始化後,即刻轉成 immutable。
  • API 的參數設計,儘量使用 immutable 型態。

Q: 為什麼建議使用 Immutable?

A: 因為 Muli-Thread。學 Scala 最主要的目的,就是加速開發平行運算的程式,也就是 multi-thread 的程式。Immutable Read Only 的特性,使得有 Thread-Safe 效果,因此在程式撰寫時,建議儘量使用 Immutable class。

Twitter Coding Style

由於 collection class 在 mutable 及 immutable 都會有。所以在使用時,為了避免誤用,Twitter 建議明確指出是目前是使用那一種。如完整指出使用 mutable。不要使用 import scala.collection.mutable._

eg:

import scala.collection.mutable

val set = mutable.Set()

常用的 Collection Sample

List

宣告:

scala> val colors = List("red", "blue", "green")
colors: List[String] = List(red, blue, green)

取頭:

scala> colors.head
res0: String = red

去頭:

scala> colors.tail
res1: List[String] = List(blue, green)

取其中一個值:

scala> colors(1)
res2: String = blue

取最後一個:

scala> colors.last
res5: String = green

去掉最後一個:

scala> colors.init
res4: List[String] = List(red, blue)

長度:

scala> colors.length
res8: Int = 3

串成字串:

scala> colors.mkString(",")
res9: String = red,blue,green

scala> colors.mkString("[", "],[", "]")
res10: String = [red],[blue],[green]

加資料在前面 (prepend):

scala> val colors2 = "yellow" +: colors
colors2: List[String] = List(yellow, red, blue, green)

scala> "yellow" :: colors
res44: List[String] = List(yellow, red, blue, green)

加資料在後面 (append):

scala> val color3 = colors2 :+ "white"
color3: List[String] = List(yellow, red, blue, green, white)

接另一個 List 在前面 (prepend):

scala> val colors4 = colors2 ++: colors
colors4: List[String] = List(yellow, red, blue, green, red, blue, green)

scala> colors2 ::: colors
res45: List[String] = List(yellow, red, blue, green, red, blue, green)

接另一個 List 在後面 (append):

val colors5 = colors2 ++ colors
colors5: List[String] = List(yellow, red, blue, green, red, blue, green)

Scala Right Operator

  • Right Operator :,Scala 定義 Operator,如果結尾是 :,就當作 Right Operator 處理。
  • 一般熟悉的是 Left Operator。eg: a + b,實際是 a.+(b);Right Operator 是 a +: b,則是 b.+:(a)。

Scala 慣例:

  • + 用在加單一元素
  • ++ 用在加一個 collection
  • 只有 mutable 集合有類似 +=, ++=, -=, --=。

拿掉前兩個:

scala> colors4.drop(2)
res13: List[String] = List(blue, green, red, blue, green)

拿掉最後兩個:

scala> colors4.dropRight(2)
res14: List[String] = List(yellow, red, blue, green, red)

取前兩個:

scala> colors4.take(2)
res0: List[String] = List(yellow, red)

取最後兩個:

scala> colors4.takeRight(2)
res1: List[String] = List(blue, green)

foreach:

scala> colors4 foreach { println }
yellow
red
blue
green
red
blue
green

判斷是否沒有資料:

scala> colors4.isEmpty
res17: Boolean = false

scala> List().isEmpty
res46: Boolean = true

只留符合條件的資料:

scala> colors4 filter { _.length > 4 }
res19: List[String] = List(yellow, green, green)

計算符合條件的資料數量:

scala> colors4 count { _.length > 4 }
res20: Int = 3

去除前面符合條件的資料,當遇到不符合條件就停止 (while - break):

scala> colors4
res47: List[String] = List(yellow, red, blue, green, red, blue, green)

scala> colors4 dropWhile { _.length > 4 }
res21: List[String] = List(red, blue, green, red, blue, green)

取前面符合條件資料,當遇到不符合條件就停止 (while - break):

scala> colors4
res47: List[String] = List(yellow, red, blue, green, red, blue, green)

scala> colors4 takeWhile { _.length > 4 }
res35: List[String] = List(yellow)

收集並加工符合條件的資料 (filter 的加強版) :

scala> colors4 collect { case x if x.length > 4 => x + x }
res48: List[String] = List(yellowyellow, greengreen, greengreen)

找第一個符合條件的資料

scala> val colors4 = List("yellow", "red", "blue", "green", "red")
colors4: List[String] = List(yellow, red, blue, green, red)

scala> colors4.find { _ == "red" }
res0: Option[String] = Some(red)

scala> colors4.find { _ == "black" }
res1: Option[String] = None

找到第一個符合條件的資料,並加工

colors4.collectFirst { case x if (x.length == 3) => x + x }
res3: Option[String] = Some(redred)

找到第一個符合條件的位置。

scala> val colors4 = List("yellow", "red", "blue", "green", "red")

scala> colors4.indexWhere( _ == "red")
res7: Int = 1

scala> colors4.indexWhere( _ == "red", 2)
res8: Int = 4

scala> colors4.indexWhere( _ == "black", 2)
res10: Int = -1

scala> color4.lastIndexWhere( _ == "red")
res11: Int = 4

scala> color4.lastIndexWhere( _ == "red", 3)
res17: Int = 1

由於 Scala 拿掉 break,因此在原本 Java 使用 break; 的情境,就可以使用 dropWhile, takeWhile, collect, collectFirst, indexWhere, lastIndexWhere。

入門 Scala Collection 建議可以由 List 下手。 List 有的 function,大都的 Collection 也都有。

ListBuffer

宣告:

scala> val list = mutable.ListBuffer.empty[String]
list: scala.collection.mutable.ListBuffer[String] = ListBuffer()

scala> val list = mutable.ListBuffer("a", "b", "c")
list: scala.collection.mutable.ListBuffer[String] = ListBuffer(a, b, c)

Append:

scala> list += "d"
res0: list.type = ListBuffer(a, b, c, d)

Prepend:

scala> "e" +=: list
res1: list.type = ListBuffer(e, a, b, c, d)

Range

scala> 1 to 10
res4: scala.collection.immutable.Range.Inclusive = Range(1, 2, 3, 4, 5, 6, 7, 8, 9, 10)

scala> 1 until 10
res5: scala.collection.immutable.Range = Range(1, 2, 3, 4, 5, 6, 7, 8, 9)

Set

Immutable 及 mutable 都有 Set,以下以 mutable.Set 當例子。

宣告

scala> import scala.collection.mutable

scala> val set = mutable.Set('a', 'b', 'c')
set: scala.collection.mutable.Set[Char] = Set(c, a, b)

資料數:

scala> set.size
res6: Int = 3

加值進 Set:

scala> set += 'd'
res0: set.type = Set(c, d, a, b)

與另一個 Set 合併:

scala> set ++= mutable.Set('a', 'b', 'e', 'f')
res1: set.type = Set(f, c, d, e, a, b)

移除一個值:

scala> set -= 'a'
res5: set.type = Set(f, c, d, e, b)

判斷是否有值:

scala> set('a')
res7: Boolean = false

scala> set('b')
res8: Boolean = true

Map

Immutable 及 mutable 都有 Map,以下以 mutable.HashMap 當例子。

宣告:

scala> import scala.collection.mutable

scala> val map = mutable.HashMap.empty[String, Int]
map: scala.collection.mutable.HashMap[String,Int] = Map()

scala> val map = mutable.HashMap("i" -> 1, "ii" -> 2)
map: scala.collection.mutable.HashMap[String,Int] = Map(ii -> 2, i -> 1)

資料數:

scala> map.size
res0: Int = 2

Keys:

scala> map.keys
res1: Iterable[String] = Set(ii, i)

Key Set:

scala> map.keySet
res2: scala.collection.Set[String] = Set(ii, i)

Values:

scala> map.values
res3: Iterable[Int] = HashMap(2, 1)

Put:

scala> map += ("iii" -> 3)
res0: map.type = Map(ii -> 2, i -> 1, iii -> 3)

Remove:

scala> map -= ("i")
res5: map.type = Map(ii -> 2, iii -> 3)

直接取值:

scala> map("iii")
res1: Int = 3

scala> map("iiii")
java.util.NoSuchElementException: key not found: iiii
  at scala.collection.MapLike$class.default(MapLike.scala:228)
  at scala.collection.AbstractMap.default(Map.scala:59)
  at scala.collection.mutable.HashMap.apply(HashMap.scala:65)
  ... 33 elided

直接取值的方式,key 不存在時,會出現 Exception。

使用的時機:你確定一定有值,或者沒值,是很嚴重的錯誤,需要用 Exception 來通知系統。

間接方式:

scala> map.get("iiii")
res3: Option[Int] = None

scala> map.get("iii")
res4: Option[Int] = Some(3)

用 get 的方式,取回 Option 的型別,再做下一步處理,一定沒問題。

Compare with Java and Conversions

Scala 與 Java Collection 互轉的原則:

Iterator               <=>     java.util.Iterator
Iterator               <=>     java.util.Enumeration
Iterable               <=>     java.lang.Iterable
Iterable               <=>     java.util.Collection
mutable.Buffer         <=>     java.util.List
mutable.Set            <=>     java.util.Set
mutable.Map            <=>     java.util.Map
mutable.ConcurrentMap  <=>     java.util.concurrent.ConcurrentMap

使用 Scala 大都會用到 Java 既有的 Library,所以會遇到取得的資料型別是 Java 的 Collection。如果要使用 Scala 提供的功能時,會需要將 Java 的 Collection 轉成 Scala 的 Collection。

遇到這種情形時,只要 import JavaConversions 即可,程式碼:import scala.collection.JavaConversions._。

注意:

  • 這類型的轉換,在 Scala 是利用 implicit 機制完成,原理是產生新的 Scala Collection Class 去 wrap 原來的 Java Class,因此在使用時要小心,以免吃光記憶體。
  • 在 Eclipse 上,會提醒 implicit 的轉換。
  • 依 Java 習慣,不建議直接用 import scala.collection.JavaConversions._,可以利用 Eclipse 的 Source -> Organize Imports 來整理 import,會自動整理成明確 import 那些東西。

Scala 的物件導向 (Session 3)

Scala 的物件導向

OOP

  • 封裝 (Encapsulation)
  • 繼承 (Inheritance)
  • 多型 (Polymorphism)

Class

宣告方式

class 名稱 [extends Class or Trait 名稱] [with Trait 名稱] {
  
}

eg:

scala> class Test
defined class Test

scala> class Test2 extends Test 
defined class Test2
class 名稱([存取等級] [val or var] 變數名稱: 型別) [extends Class or Trait 名稱] [with Trait 名稱] [with Trait 名稱] {
  def this() = this(...)
}

eg:

scala> class Test(a: Int, b: Double) {
     |   println(s"${a}, ${b}")
     | }
defined class Test

scala> class Test2(a: Int) extends Test(a, 10.0) {        
     | def this() = this(20)
     | }
defined class Test2

Java Bean Like

scala> class Test(var name: String, var age: Int, var address: String)

scala> val a = new Test("abc", 10, "aaaaaa")
a: Test = Test@74d1dd7e

scala> a.name
res0: String = abc

scala> a.age
res1: Int = 10

scala> a.address
res2: String = aaaaaa

scala> a.name = "abcdef"
a.name: String = abcdef

scala> a.age = 20
a.age: Int = 20

scala> a.address = "bbbbbb"
a.address: String = bbbbbb

Primary and Auxiliary Contructors

在 Scala 及 Swift 中,Constructor 有主、副之分。

eg:

scala> class Test(a: Int, b: Double) {
     |   println(s"${a}, ${b}")
     |   
     |   def this() = this(10, 20.0)
     | }
defined class Test

Primary Constructor 是

class Test(a: Int, b: Double) { 
    println(s"${a}, ${b}")
}

Auxiliary Constructor 是

    def this() = this(10, 20.0)

轉換成 Java 語法來看:

class Test {
    public Test(int a, double b) {
        System.out.println("" + a + ", " + b)
    }
    
    public Test() {
        this(10, 20.0);
    }
}
  • public Test(int a, double b) 是 Primary Constructor
  • public Test() 是 Auxiliary Constructor

Override

當子類別要改寫父類別的函式時,在宣告函式時,一定要用 override,否則會報錯。

eg:

scala> class Test {
     | def echo = "Echo"
     | }
defined class Test

沒用 override 會報錯

scala> class Test2 extends Test {
     | def echo = "Echo2"
     | }
<console>:9: error: overriding method echo in class Test of type => String;
 method echo needs `override' modifier
       def echo = "Echo2"

正解

scala> class Test2 extends Test {
     | override def echo = "Echo2"
     | }

注意事項

宣告 class 時,如果 primary constructor 的變數,沒有加 val or var 則不會自動變成 member data。

scala> class Test(a: Int)
defined class Test

scala> val t = new Test(10)
t: Test = Test@7c8c0c57

scala> t.a
<console>:10: error: value a is not a member of Test
              t.a

Object

Scala 的 object 等同於 Java Singleton

Scala 允許 object 的名稱與 class 相同,且可以放在同一份 source code 中。這類的 object 稱作 Companion Object。

類比 Java 的實作,就是把 static 相關的變數及函式(Class member data and function),放到 object 中。

在 object 中,就不用 static 這個關鍵字。

eg:

scala> object Test {
     | def myTest = println("abc")
     | }
defined object Test

scala> Test.myTest
abc

在 Java 要寫一個應用程式 (Application),需要在一個 public class 內,宣告一個 public static void main (String[] args) 函式。

eg:

public class Test {
    public static void main(String[] args) {
    }
}

改用 Scala 後,則在一個 object 宣告 def main(args: Array[String])

eg:

object Test {
  def main(args: Array[String]) {
  }
}

Trait

Scala 的 trait 可以類比成 Java 的 interface。一個 class 可以繼承(實作)多個 trait。在使用時,如果 class 沒有繼承其他的 class or trait 時,則用 extends,否則用 with

eg:

scala> trait MyTrait
defined trait MyTrait

scala> class Test
defined class Test

scala> class Test2 extends Test with MyTrait
defined class Test2

scala> class Test3 extends MyTrait
defined class Test3

在 Java 8 以前,interface 沒有 default function 的功能,也因此無法在 interface 內實作函式。

Scala 的 trait 則打破這個限制,允許在 trait 內有變數、函式的實作。也因此更起達到多重繼承的效果。

eg: Trait 內含變數與實作函式

scala> trait MyTrait {
     |   val a = 10
     |   def test: Int
     |   def sum(x: Int, y: Int) = x + y + a
     | }
defined trait MyTrait

scala> class Test extends MyTrait {
     |   def test = a + 1000
     | }
defined class Test

scala> val t = new Test
t: Test = Test@597b40a8

scala> t.test
res0: Int = 1010

scala> t.sum(t.a, 10)
res2: Int = 30

eg: 多個 Trait;有多重繼承效果

scala> trait MyTrait1 {
     |   val a = 10
     |   def test1: Int
     | }
defined trait MyTrait1

scala> trait MyTrait2 {
     |   val b = 20
     |   def test2: Int
     | }
defined trait MyTrait2

scala> trait MyTrait3 {
     |   val c = 30
     |   def test3: Int
     | }
defined trait MyTrait3

scala> class Test extends MyTrait1 with MyTrait2 with MyTrait3 {
     |   def test1 = b + 1
     |   def test2 = c + 2
     |   def test3 = a + 3
     | }
defined class Test

scala> val t = new Test
t: Test = Test@37f7bfb6

scala> t.test1
res0: Int = 21

scala> t.test2
res1: Int = 32

scala> t.test3
res2: Int = 13

object 也可以繼承(實作) trait

scala> trait MyTrait
defined trait MyTrait

scala> object Test extends MyTrait
defined object Test

Scala 增強的功能

自定 Access Level

Scala 允許自定 Access Level,因此在程式設計上會更有彈性,安全性也會更高。

使用方式:modifier[this, class or package]. eg: private[Test]

eg: 變數只允許自己本身的 instance 使用。比 private 更嚴格。

scala> class TestPrivateThis {
     |   private[this] val a = 10
     | 
     |   def func(): Int = a + 10
     | 
     |   def func(that: TestPrivateThis): Int = a + that.a
     | }
<console>:12: error: value a is not a member of TestPrivateThis
         def func(that: TestPrivateThis): Int = a + that.a

Operator Overloading

在 Java 中,無法在 class 中,定義 +,-,*,/ 這類四則運算。但在 Scala 則可以,這會讓程式碼更簡潔也更方便閱讀。

eg:

class Rational(n: Int, d: Int) {

  require(d != 0)
  
  def this(n: Int) = this(n, 1)
  
  def gcd(a: Int, b: Int): Int = if (a == 0) b else gcd(b % a, a)
  
  val g = gcd(n, d)
  
  val numer = n / g
  
  val denom = d / g
  
  
  override def toString = if (denom != 1) s"${numer} / ${denom}" else s"${numer}"
  
  def +(that: Rational) = new Rational(numer * that.denom + denom * that.numer, denom * that.denom)
  
  def -(that: Rational) = new Rational(numer * that.denom - denom * that.numer, denom * that.denom)
  
  def *(that: Rational) = new Rational(numer * that.numer, denom * that.denom)
  
  def /(that: Rational) = new Rational(numer * that.denom, denom * that.numer)
  
}


object Rational {
  
  def main(args: Array[String]) {
   
    val r1 = new Rational(3, 7)
    val r2 = new Rational(5, 21)
    
    println(r1 * r2)
  }
}

apply Function

當在 class 宣告 apply 的函式後,使用時,可以省略函式的名稱。

eg:

scala> class Test {
     | def apply(a: Int, b: Int): Int = a + b
     | }
defined class Test

scala> val t = new Test
t: Test = Test@300a2ae

scala> val a = t(10, 20)
a: Int = 30

在上例中 val a = t(10, 20) 就是呼叫 apply 函式。apply 函式,在 scala collection 相關 class (HashMap, Array 等) 很常用到。

case class

Scala 在宣告 class 時,可以使用 case 這個修飾詞,使用後,在產生 instance (以後就不用 object 這個字眼,以免跟 scala 的 object 混餚) 時,可以省略 new;如果 primary contructor 有參數時,會自動將參數轉成 val 型態的 member data。

eg:

scala> case class Test(name: String, age: Int)
defined class Test

scala> val t = Test("abc", 20)
t: Test = Test(abc,20)

scala> t.name 
res0: String = abc

scala> t.age
res1: Int = 20

scala> t.name = "abcdef"
<console>:10: error: reassignment to val
       t.name = "abcdef"

case class 與 apply, object, pattern match (match - case) 有密不可分的關係,在第二階段會再詳述。

Enumeration

基本用法

Java 版本

public enum DirectionJava {
    TOP, DOWN, LEFT, RIGHT;
}

在 Java 使用 enum 宣告即可。

Java class 使用 enum 後會變成 final class,因此 enum 不能再繼承其他的 class (Java 是單一繼承),也不能再被其他 class 繼承。

enum 的 Constructor 設計成 private,所以之後也無法自行產生 instance,只能使用內定的值 (static 值) 或 null。

總結以上,各位不覺得 enum 就跟 signleton 很像嗎?!

Scala 版本

object DirectionScala extends Enumeration {
  val Top, Down, Left, Right = Value
}

Scala 的 Enumation 歷史比 Java 早,因此實作語法上,與 Java 不太相同,但觀念差不多。

Scala 的 Enumeration 跟 Java 的很類似,但 Scala 的內定值型別是 Enumeration.Value。

Enumeration.Value 本身是個 abstract class。在 Enumeration 內有一個實作的 class: protected class Val,如果需要自定 Enumeration 時,就會需要繼承這個 class。

進階

Java 版

public enum Planet {
    MERCURY (3.303e+23, 2.4397e6),
    VENUS   (4.869e+24, 6.0518e6),
    EARTH   (5.976e+24, 6.37814e6),
    MARS    (6.421e+23, 3.3972e6),
    JUPITER (1.9e+27,   7.1492e7),
    SATURN  (5.688e+26, 6.0268e7),
    URANUS  (8.686e+25, 2.5559e7),
    NEPTUNE (1.024e+26, 2.4746e7);

    private final double mass;   // in kilograms
    private final double radius; // in meters
    
    Planet(double mass, double radius) {
        this.mass = mass;
        this.radius = radius;
    }
    
    private double mass() { return mass; }
    private double radius() { return radius; }

    // universal gravitational constant  (m3 kg-1 s-2)
    public static final double G = 6.67300E-11;

    double surfaceGravity() {
        return G * mass / (radius * radius);
    }
    
    double surfaceWeight(double otherMass) {
        return otherMass * surfaceGravity();
    }
    
    public static void main(String[] args) {
        if (args.length != 1) {
            System.err.println("Usage: java Planet <earth_weight>");
            System.exit(-1);
        }
        double earthWeight = Double.parseDouble(args[0]);
        double mass = earthWeight/EARTH.surfaceGravity();
        for (Planet p : Planet.values())
           System.out.printf("Your weight on %s is %f%n",
                             p, p.surfaceWeight(mass));
    }
}

Scala 版

object Planets extends Enumeration {

  val G: Double = 6.67300E-11

  final case class Planet private[Planets] (mass: Double, radius: Double) extends Val {
    def surfaceGravity(): Double = G * mass / (radius * radius)
    def surfaceWeight(otherMass: Double): Double = otherMass * surfaceGravity()
  }

  val Mercury = Planet(3.303e+23, 2.4397e6)
  val Venus = Planet(4.869e+24, 6.0518e6)
  val Earth = Planet(5.976e+24, 6.37814e6)
  val Mars = Planet(6.421e+23, 3.3972e6)
  val Jupiter = Planet(1.9e+27,   7.1492e7)
  val Saturn = Planet(5.688e+26, 6.0268e7)
  val Uranus = Planet(8.686e+25, 2.5559e7)
  val Neptune = Planet(1.024e+26, 2.4746e7)


  def main(args: Array[String]) {
    require(args.length == 1, "Usage: java Planet <earth_weight>")

    val earthWeight = args(0).toDouble  
    val mass = earthWeight / Planets.Earth.surfaceGravity

    Planets.values.foreach(p => println("Your weight on %s is %f%n".format(p, p.asInstanceOf[Planet].surfaceWeight(mass))))
  }

}

附錄

activator

產生專案

完整的指令: activator new [project-name] [template-name]

一般的步驟:

  • 執行:activator new 專案名稱
  • 選擇專案的 template
Fetching the latest list of templates...

Browse the list of templates: http://typesafe.com/activator/templates
Choose from these featured templates or enter a template name:
  1) minimal-akka-java-seed
  2) minimal-akka-scala-seed
  3) minimal-java
  4) minimal-scala
  5) play-java
  6) play-scala
(hit tab to see a list of all templates)

1), 2) 是 akka 專案

3), 4) 是一般應用程式專案

5), 6) 是寫 Play Framework (web) 專案

  • 在專案目錄下的 project 目錄,加入 plugins.sbt 檔案,內容如下:
addSbtPlugin("com.typesafe.sbteclipse" % "sbteclipse-plugin" % "4.0.0")

addSbtPlugin("com.eed3si9n" % "sbt-assembly" % "0.13.0")

注意:兩行中間,一定要空一行

  • 執行:activator eclipse 產生 eclipse 可以匯入的專案格式
  • 使用 eclipse 匯入 (General -> Existing Projects into Workspace)

命令列模式

在專案的目錄下,執行 activator,會進入 Activator 的命令列模式。與 Maven 相同,有 reload, update,clean, compile, package, test 等指定;如果有加入 sbteclipse-plugin,也可在這使用 eclipse。

  • reload: 重新載入 SBT 設定
  • update: 更新相關的 dependency library
  • clean: 將先前產生的 *.class, *.jar 清除
  • compile: 編譯專案
  • package: 打包專案
  • test: 執行 Unit Test

修改 Dependency

與 Maven 相同, Activator 可以管理專案的 dependency。修改專案目錄下的 build.sbt。

eg:

libraryDependencies += "mysql" % "mysql-connector-java" % "5.1.34"

libraryDependencies += "org.apache.commons" % "commons-lang3" % "3.3.2"

libraryDependencies += "org.apache.commons" % "commons-email" % "1.3.3"

注意:每行中間,一定要空一行

修改完 dependency,請再執行 activator eclipse 重新產生 eclipse 的專案,在 eclipse IDE 再重新 reload 一次,即可生效。

2015年7月25日 星期六

基本語法與 Data Type (Session 2)

基本語法與 Data Type

前言

  • Scala 的 Tab 是兩個空隔,與 Java 預設四個不同
  • Scala 已經沒有 break 與 continue 關鍵字可用
  • Scala 還保有 return 但不建議使用
  • Scala 還保有 throw Exception,但不建議使用。建議 refactor 成 Option or Either;IO相關可例外。
  • Scala 依然可以用 try-catch-finally。

變數宣告方式

變數的宣告方式如下:

var 變數名稱: 資料型別 = 值
val 變數名稱: 資料型別 = 值

ex:

val a: Int = 10
var b: Double = 20.0

其中,資料型別可以省略,如下:

val a = 10
var b = 20.0

val 等同在 java 使用 final。

var 則如同 java 一般的宣告。

scala 鼓勵儘量使用 val。

使用 var 宣告時,可以使用 _ (萬用字元) 當預設值,此時 scala 會依型別,給予預設值。val 則不可用 _。

var a: Int = _ /* a 會是 0 */

class Test
var b: Test = _ /* b 會是 null */

Java Primitive Type

Java primitive type are

  • byte
  • char
  • short
  • int
  • long
  • float
  • double
  • boolean

以上這些在 Scala 是被轉成所謂的 Value Class 全都繼承自 AnyVal。

Scala 定義的 Value Class 有:

  • Unit -> ()
  • Byte -> byte
  • Char -> char
  • Short -> short
  • Int -> int
  • Long -> long
  • Float -> float
  • Double -> double
  • Boolean -> boolean

注意:省略型別時,整數值會預設是 Int,浮點數值會是 Double。

String

Scala 的 String 等於 Java 的 String。唯一要注意的是 .equals。在 Java 比對字串的內容時,要使用 .equals 不能使用 ==。但在 Scala 則可以。

In Java

String str = "hello world!";
"hello".equals(str);

In Scala

val str = "Hello world!"
"hello" == str

Scala 的字串有兩個方便的功能,讓寫作程式更方便

  • String Interpolation:字串與變數結合,字串的開頭為s, 可使用 $ 來將變數加入字串中,或者用 ${}將 statement 加入。讓程式寫作更方便,可讀性也變高。
val a = 10
val b = 20

println(s"$a + $b = ${a + b}")
  • Raw String Delimiter:在 Scala 中,可以使用 """,不處理脫序字元,且可多行。這項功能在宣告正規表示式很好用。
/* Java 列印 \r\n */
System.out.println("\\r\\n");

/* Scala */
println("""\r\n""")

/* 多行字串 */
val a = """abc
def
  ccc
eee
"""
println(a)

/* Scala Regex */
val a = """\d+""".r

Option

Option 是用來取代 null。Option 有兩個 subclass:

  • Some
  • None

宣告時用 generic 方式,來指定回傳的型別。

從Option 取值前,先用 isDefined 來判斷是否是 Some,是的話,再用 get 來取值。

def parseInt(str: String): Option[Int] = {
  try {
    Option(str.toInt)
  }
  catch {
    case ex: Exception => None
  }
}

val a = parseInt("abc")

if (a.isDefined) println(a.get) else println("None")

在使用 Functional Languge 方式時寫程式時,不會這樣子做。

Tuple

Tuple 可以將兩種以上,不同型別的資料組合起來使用;可以把它當作更精簡的 Bean 來看。

宣告:

 val a: (Int, String) = (10, "ABC")

或省略型別

val a = (10, "ABC")

取值使用時,從 _1 開始,指定第一個值。以此類推。

val a = (10, "ABC")

println(a._2)

Tuple 最多只可以用到 22 個參數。

Function

完整的 function 宣告如下:

def 函數名稱(變數名稱: 型別, 變數名稱: 型別, ...): 回傳型別 = {
  函數內容
}

/* 等同 Java: 
boolean test(int a, int b) { 
    return a == b; 
} */
def test(a: Int, b: Int): Boolean = {
  a == b
}

/* 等同 Java: 
void test(int a) { 
    System.out.println(a); 
} */
def print(a: Int): Unit = {
  println(a)
}

函式的回傳值,是看函式的最後一個 statement 的回傳值決定

簡潔的寫法:

  • 沒有回傳值時
原:
def test(a: Int): Unit = {

}

簡:
def test(a: Int) {

}
  • 省略寫回傳值,依函式的最後一行來決定
原:
def test(a: Int): Int = {
  val b = a + 10
  b
}

簡:
def test(a: Int) = {
  val b = a + 10
  b
}
  • 沒有傳入參數時,可以省略 (),呼叫時,也可以省略。
原:
def test(): Int = {
  val a  = 10
  a
}

簡:
def test: Int = {
  val a = 10
  a
}

再簡:
def test = {
  val a = 10
  a
}

呼叫時:
test
  • 如果函式只有一行 statement,{ 和 } 可省略
原:
class Bean {
  private var age: Int = 0
  
  def getAge(): Int = {
    age
  }
  
  def setAge(a: Int): Unit = {
    age = a
  }
}

簡:
class Bean {
  private var age = 0
  
  def getAge = age
  
  def setAge(a: Int) = age = a
  
}

使用:
val b = new Bean
b.setAge(10)
b.getAge

Function 進階

  • 傳入的參數,預設都是 val,也就是不能再修改值。
def test(a: Int) = {
  a = 10 /* error: reassignment to val */
}
  • Named Arguments:在呼叫函式時,可以加入函式宣告的參數名稱,尤其是當函式的參數很多時,來增加可讀性;有指定參數的名稱時,就不一定要依照函式參數的順序傳入。
def test(a: Int, b: Int) = a + b

/* a,b 的順序就可互換 */
test(b = 10, a = 30)
  • Default Parameter Value:宣告函式時,可以給定參數預設值,當呼叫時,沒有傳入值時,就會使用此預設值。這項功能,常見於動態語言, ex: PHP。在設計程式,或者做 refactor 時,可利用這項特性,來增強相容性。
def test(a: Int, b: Int = 0) = a + b

test(10) /* b 會用 0 傳入 */

test(10, 20)

refactor 案例:

原始:
def test(a: Int): Int = a + 10

後來希望可以控制 10 這個值,函式改寫成:

def test(a: Int, b:Int) = a + b

但已經存在的程式碼,太多地方使用,不想去更動它,所以可以寫成:

def test(a: Int, b: Int = 10) = a + b

Java 也行。但要多一個函式的宣告:

原:

int test(int a) {
    return a + 10;
}

改:

int test(int a, int b) {
    return a + b;
}

int test(int a) {
    return test(a, 10);
}

有預設值的參數,不一定是要放在最後,但建議放在最後。目前我遇到有設計這項功能的程式語言,都會限定要放在最後。

/* 沒有放在最後的話,就要給定參數名稱 */
def test(a: Int, b: Int = 0, c: Int) = a + b + c

test(10, 20) /* error: not enough arguments for method test */

test(a = 10, c = 20)
  • Repeapted arguments: 可以宣告不定個數的參數的函式,並且可以使用 Array 或 List 傳入。
def test(args: String*) {
  args.foreach { println }
}

test("1", "2")

test("A", "B", "C")

val args = Array("a", "b", "c", "d")
test(args: _*)

val lst = List("a", "1", "b", "2")
test(lst: _*)

IF - ELSE IF - ELSE

在 Scala 拿掉了 Java 的三元運算子 ?: (ex: w = x ? y : z);需改用 if else

val w = if (x) y else z

也從這個例子中,Scala 在 if - else 的設計,是可以回傳值,在程式寫作時,可以多利用,ex:

/* Java */
int a = 0;

if (xx)
  a = 10;
else if (yy)
  a = 20;
else
  a = 30;

或者
int a = xx ? 10 : (yy ? 20 : 30);
 

/* Scala */
val a = if (xx) 10 else if (yy) 20 else 30

While Loop

while 的使用方式,跟 java 一樣

def gcdLoop(x: Long, y: Long): Long = {
  var a = x
  var b = y
  while (a != 0) {
    val temp = a
    a = b%a
    b = temp
  }
  b 
}

var line = ""
do {
  line = readLine()
  println("Read: "+ line)
} while (line != "")

For Loop

Scala 的 for 語法,跟 Java 的 for 用在 Iterable 很像。

/* 列印 1 ~ 9 */
for (i <- 1 to 9)
  println(i)

for (i <- 1 until 10) {
  println(i)
}

/* 九九乘法 */
for (i <- 1 to 9) {
  for (j <- 1 to 9)
    println(s"$i x $j = ${i + j}")
}

可以在 for 加 if 判斷,多個 if 時,是用 and 來判斷

/* 列印 1 ~ 100 的偶數 */
for (i <- 1 to 100 if i % 2 == 0)
  println(i)
  
/* 多個判斷 */
for (i <- 1 to 100
     if i % 2 == 0
     if i % 5 == 0
) println(i)

也可以將 nested for 縮成一個 for。使用時,要用 ; 來區分 nested for

/* 九九乘法 */
for (i <- 1 to 9;
     j <- 1 to 9
) println(s"$i x $j = ${i * j}")

使用 for yield 組出 collection

val a = for (i <- 1 to 9) yield i

val b = for (i <- 1 to 9) yield {
  if (i % 2 == 0) i 
  else 0
}
/* 可以把 else 0 拿掉試看看 */

Scala 的 for 雖然語法上跟 Java 很像,但底層的實作卻是大不相同。 Scala 的 for 主要是依循 Functional Language 的 Monads 模型做出來的。因此在使用 for yield 時,要去注意回傳 collection 的型別是什麼。

當轉換到 Functional Language 的思維時,其實 for 就會很少使用。都會直接用 monads 的模型在實作。

MATHCH CASE

match case 是 Scala 最重要的功能之一,使用的概念與 Java 的switch case 類似,但有更強大的功能。

由於 Scala 拿掉了 break,所以在每個 case 執行完後,會直接離開 match block。這個與 Java switch case 有很大的差別;在 Java 的 case 如果沒有下 break,會往下一個 case 繼續執行。

Scala 的 default case 的寫法是: case _,使用萬用字元 _ 當 default case。

 val a = 10

a match {
  case 1 =>
    println(1)  
  case 2 =>
    println(2)
  case _ =>
    println("other")
}

val b = "abc"

b match {
  case "def" =>
    println("DEF")
  
  case "abc" =>
    println("ABC")
    
  case _ =>
    println(b)
}

進階用法:

  • case 加入型別及 if 的判斷
val a = 10

a match {
  case x if (x % 2 == 0) =>
    println("event")
  case _ =>
    println("odd")
}
  • match case 可以回傳值
val a = 99

val isEvent = a match {
  case x if (a % 2 == 0) => true
  case _ => false
}

在 Scala 使用 match case 時,雖然不強制一定要給 default case,但還是 養成好習慣,寫入 default case 要做什麼處理,當然也可以不做任何事情。

Scala 如果比對不到時,會出現 Runtime Error。

val a = 5

a match {
  case a < 5 => 
    println("a < 5")
    
  case _ => /* 不做任何處理 */
}

不同的程式語言對於 match(switch) case 設計不盡相同,像 C++, Java 需要下 break 才會離開 switch block。Scala 與 Apple Swift 則不用。

推薦各位學 Scala 還有一項優點,就是熟 Scala 後,想再去學 Apple Swift 會非常快。Swift 的語法與設計概念,有很多與 Scala 雷同,而且比 Scala 更好用。

TRY - CATCH - FINALLY

scala 還保留 try,catch,finally,使用觀念與注意事項與 Java相同。

  • finally 是最後一定會被執行的區塊,千萬不要在此用 return 回傳值。切記:Scala 禁用 return。
  • catch 的語法,有點像 match case,變成 catch case。
  • 與 Java 不同的地方,就是 try - catch 可以回傳值

語法示意:

try {
  .....
}
catch {
  case ex: IOException =>
    ...
  
  case ex: SQLException =>
    ...
    
  case ex: Exception =>
    ...
}
finally {
  ....
}

ex:

/* 注意 try catch 是可以回傳值的 */
def parseInt(a: String) = {
  try {
    Option(a.toInt)
  }
  catch {
    case ex: Exception => None
  }
  finally {
    println("end")
  }
}

再次提醒,不論 Java 或 Scala 都千萬不要在 finally 用 return。

def f: Int = try { return 1 } finally { return 2 }
def g: Int = try { 1 } finally { 2 }

f /* return 2 */
g /* return 1 */