2014年7月31日 星期四

Swift Language Guide - Basic Operators

Swift Language Guide - Basic Operators

Assignment

  • Assignment NOT return a value

      if x = y { <-- Error
      }
    
  • Assignment with Tuple and Swap

      var (x, y) = (1, 2)
      println("(x, y) = (\(x), \(y))")
    
      (x, y) = (y, x)
      println("(x, y) = (\(x), \(y))")
    

Remainder

Support remainder (%) on FLOATING-POINT

println(8 % 3.3)

Ternary

question ? answer1 : answer2

Range

  • Closed Range

      for i in 0...5 {
          println(i)      <-- print 0 ~ 5
      }
    
  • Half-Closed Range

      for i in 0..<5 {
          println(i)
      }
    

P.S. Half-Closed range operator is changed. old .. is NOT USED.

Swift Language Guide - The Basics

Swift Language Guide - The Basics

Constants and Variables

let a = 10 <-- Constant
var b = 20 <-- Variable
var a =  10, b = 1.0, c = "abc" <-- multiple assignments in a line

println("\(a), \(b), \(c)")

String with Variables

var a =  10, b = 1.0, c = "abc"

var str = "\(a), \(b), \(c)"

println(str)

Multiple Statements in a Line

Use semicolon ;

let a = 10; println(a)

Data Type

Integer

Swift has 8, 16, 32, 64 bit forms with signed and unsigned.

Most usage: Int and UInt is platform Dependence.

  • Int on 32-bit is Int32
  • Int on 64-bit is Int64

The default type is Int if declaration without type annotation like this

let a = 10 <-- the type is Int
let b = UInt8.min <-- the type is UInt8 and values is 0

Declaration:

let decimalInt = 17
let binaryInt = 0b10001
let octalInt = 0o21
let hexInt = 0x11

println(decimalInt)
println(binaryInt)
println(octalInt)
println(hexInt)

let oneMillion = 1_000_000
println(oneMillion)

Floating-Point

The same with common language support Float and Double.

The default type is Double if declaration without type annotation like this

let a = 3.1415 <-- the type is Double

Declaration:

  • e for decimal 10^exp: 1.25e2 = 1.25 x 10^2
  • p for hexadecimal 2^exp: 0xFp2 = 15 x 2^2 = 60.0
let justOverOneMillion = 1_000_000.000_000_1
println(justOverOneMillion)

let a = 1.25e2
let b = 1.25e-2

println(a)
println(b)

let c = 0xFp2
let d = 0xFp-2

println(c)
println(d)

let e = 0xC.3p0
println(e)

Conversion

Floating-point to Integer will truncate point part

let a: Int16 = 10
let b: Int8  = 2
let c  = a + Int16(b)

let d = 3
let pi = Double(d) + 0.1415926

println(pi)

let e = Int(pi)
println(e)

Type Aliases

typealias MyInt = Int64

println(MyInt.max)

Boolean

Type annotation is Bool

The similar type Boolean is UInt8 NOT a boolean type Bool

let t: Bool = true
let f: Bool = false
let ok = true
let error: Bool = 10  <-- Error

println("Bool only has \(t) and \(f)")

let a: Boolean = 10  <-- type is UInt8
let b: UInt8 = 20
let c = a + b
println(c)

Tuples

let http404 = (404, "Not Found")

println("\(http404.0), \(http404.1)")

let (code, msg) = http404

println("\(code): \(msg)")

let (onlyCode, _) = http404

println("\(onlyCode)")

let (_, onlyMsg) = http404

println("\(onlyMsg)")

let another404 = (code: 404, msg: "Not Found")

println("\(another404.code), \(another404.msg)")

func test(a: Int, b: String) -> (code: Int, msg: String) {
    return (a, b)               <-- OK
    return (code: a, msg: b)    <-- OK
    return (msg: b, code: a)    <-- OK
    return (b, a)               <-- Error
}

let t = test(200, "OK")

println("\(t.0), \(t.1)")
println("\(t.code), \(t.msg)")

Optional

  • There is a value, and it equals x

OR

  • There isn't a value at all

If statement and Forced Unwrapping

let str = "123"
let num = str.toInt()

if num {
    println("\(str) is a number \(num)")
}
else {
    println("\(str) is NOT a number")
}

Optional Binding

let str = "123"
if let tmp = str.toInt() {
    println("\(str) is a number \(tmp)")
}
else {
    println("\(str) is NOT a number")
}

Unwrap

use ! to unwrap optionals

var test: String? = "abc"

println(test)   <-- abc
println(test!)  <-- abc

test = nil

println(test)   <-- nil
println(test!)  <-- fatal error: unexpectedly found nil while unwrapping an Optional value

Implicitly Unwrapped Optionals

func toBeOrNotToBe(be: Bool) -> String? {
    return be ? "ToBe" : nil
}

let be: String! = toBeOrNotToBe(false) <-- implicitly unwrapped
println(be)                         <-- nil
println(toBeOrNotToBe(false))       <-- nil
println(toBeOrNotToBe(true))        <-- ToBe
Swift Note 1

Swift Notes

switch-case with where

let vegetable = "red pepper"
var vegetableComment: String = ""

switch vegetable {

case "celery":
    vegetableComment = "Add some raisins and make ants on a log"

case "cucumber", "watercress":
    vegetableComment = "That would make a good tea sandwich"

case let x where x.hasSuffix("pepper"):
    vegetableComment = "Is it a spicy \(x) ?"

default:
    vegetableComment = "Everything tastes good in soup"
}

println(vegetableComment)

Same Function Name with Same Parameters

In Others Failure

void abc(int a, int b)
void abc(int c, int d)

Swift OK

func total(productPrice price: Int, numberOfTimes times: Int) -> Int {
    return price * times
}

func total(productSize size: Int, numberOfTimes times: Int) -> Int {
    return size * times * 3
}

func total(amount: Int,times: Int) -> Int {
    return amount * times * 2
}


println(total(productPrice: 10, numberOfTimes: 20))
println(total(productSize: 10, numberOfTimes: 20))
println(total(30, 20))

willSet and didSet

var triangle: EquilateralTriangle {
willSet {
    //println("triangle willSet")
    square.sideLength = newValue.sideLength
}
}

var square: Square {
didSet {
    triangle.sideLength = square.sideLength
}
}

Enum

toRaw and fromRaw

enum Rank: Int {
    case Ace = 1
    case Two, Three, Four, Five, Six, Seven, Eight, Nine, Ten
    case Jack, Queen, King

    func desc() -> String {
        switch self {
        case .Ace: return "ace"
        case .Jack: return "jack"
        case .Queen: return "quene"
        case .King: return "king"
        default: return String(self.toRaw())
        }
    }
}


let ace = Rank.Ace
println(ace.desc())
println(ace.toRaw())

if let tmp = Rank.fromRaw(20) {
    println(tmp.desc())
}
else {
    println("not a rank")
}

No Row Type, No toRaw and fromRaw

enum Suit {
    case Spades, Hearts, Diamonds, Clubs

    func desc() -> String {
        switch self {
        case .Clubs: return "clubs"
        case .Diamonds: return "diamonds"
        case .Hearts: return "hearts"
        case .Spades: return "spades"
        }
    }
}


let spades = Suit.Spades
println(spades.toRaw()) // error

Instance of Enum

enum ServerResponse {
    case Result(String, String)
    case Error(String)
}

let success = ServerResponse.Result("6:00 am", "8:09 pm")
let error = ServerResponse.Error("Out of cheese")
let success2 = ServerResponse.Result("abc", "def")

switch success {
case let .Result(a, b): println("from \(a) to \(b)")
case let .Error(error): println(error)
}

switch success2 {
case let .Result(a, b): println("from \(a) to \(b)")
case let .Error(error): println(error)
}

success and success2 are Different instances.

Struct

struct Card {
    var rank: Rank
    var suit: Suit

    func desc() -> String {
        return "The \(rank.desc()) of \(suit.color().desc()) \(suit.desc())"
    }
}

let threeOfSpades = Card(rank: Rank.Three, suit: Suit.Spades)
println(threeOfSpades.desc())

“One of the most important differences between structures and classes is that structures are always copied when they are passed around in your code, but classes are passed by reference value.”

* Struct: Pass by Value

* Class: Pass by Reference

Note: Like Java, Swift copy the reference value when class instance is assigned to variables or constant, or when passed to functions. Variables is passed by reference with inout.

Protocol like Java Interface

class abc {

}

protocol ExampleProtocol {
    var simpleDescription: String { get }
    mutating func adjust()
}

class SimpleClass : abc, ExampleProtocol {
    var simpleDescription: String = "A very simple class."

    var anotherProperty: Int = 69105

    func adjust()  {
        simpleDescription += " Now 100% adjusted."
    }
}

var a = SimpleClass()
a.adjust()
println(a.simpleDescription)

a.simpleDescription = "abc"
println(a.simpleDescription)

struct SimpleStructure : ExampleProtocol {
    var simpleDescription: String = "A simple structure"

    mutating func adjust() {
        simpleDescription += " (adjusted)"
    }

}

var b = SimpleStructure()
b.adjust()
println(b.simpleDescription)
  • It can not assign a initialized value for protocol properties. Just with { get } or { get set }.

      protocol ExampleProtocol {
          var simpleDescription: String = "" <-- Error
          mutating func adjust()
      }
    
  • In Java, Class and Enum implements Interface. In Swift, Class, Struct, and Enum confirm(:) protocol.
  • Class can extend another class and confirm a protocol. class SimpleClass : abc, ExampleProtocol.
  • Function in protocol can NOT have body, like Interface in Java 7.

      protocol ExampleProtocol {
          var simpleDescription: String { get }
          mutating func adjust()
    
          mutating func hello() -> String { <-- Error
            return "hello, world!!"
          }
      }
    
  • Use mutating to override protocol's function in struct, but Not in class

Extendsion

Use extension to extend existing type.

extension Int : ExampleProtocol {
    var simpleDescription: String {
        return "The number is \(self)"
    }

    mutating func adjust() {
        self += 42
    }
}

println(7.simpleDescription)

Generics

func repeat<T>(item: T, times: Int) -> [T] {
    var ret = [T]()

    for i in 1...times {
        ret += item
    }
    return ret
}

for s in repeat("abc", 4) {
    println(s)
}
enum OptionalValue<T> {
    case None
    case Some(T)
}

var possibleInteger: OptionalValue<Int> = .None
possibleInteger = .Some(100)

2014年7月29日 星期二

Akka Supervisor Strategy  簡介 (Deprecated)

Introduction of Akka Supervisor Strategy

每一個 Akka Actor 都會有一個 supervisor。Supervisor 會監控它的子 Actor,並且決定在有 Exception 發生時,該如何處理。我們實作 Actor 時,可以不去 override 它,Akka 本身有預設的 supervisor strategy.

Akka 的 supervisor strategy 有兩種:

  • OneForOneStrategy
  • AllForOneStrategy

簡單來說,OneForOneStrategy 是其中某個 actor 發生問題時,不會去影響到它的兄弟姊妹,而 AllForOneStrategy 則會。Akka 自身預設是 OneForOneStrategy

Akka 提供四種決定,

  • Resume:繼續,不會 reset Actor 的資料
  • Restart:重啟 Actor,會 reset Actor 的資料
  • Stop: 中止 Actor
  • Escalate: 將問題往上報,讓上層的 supervisor 來決定。

Akka Actor 有一個特性,就是 Actor 的資料跟工作是分開的,因此我們可以選擇用 Resume 的方式,保留資料,繼續往下處理。

Akka 預設的 strategy 處理方式

  • ActorInitializationException => Stop
  • ActorKilledException => Stop
  • 其他的 Exception => Restart
  • 其他的 Throwable => Escalate

所以如果我們都不作任何修改的話,當有 Exception 發生時,Akka 會自動重啟 Actor。這樣子的方式,已經符合大部分的需求。

參考資料:

實作

Sample Code

延用 吃飯睡覺打東東 的企鵝笑話,來 demo Akka Strategy 的功能,名叫 東東 的企鵝,在被打第 4 次時,會說 不要打擾我,在第 6 次時,會 爆炸,在超過第 6 次後,牠就成仙了。本程式,主要是由 Reporter 來產生 Penguin,也因此 ReporterPenguin 的 supervisor。各位可以在 Reporter 的程式碼中,修改

override val supervisorStrategy = 
    OneForOneStrategy(maxNrOfRetries = 10, withinTimeRange = 1 minute) {
    //AllForOneStrategy(maxNrOfRetries = 10, withinTimeRange = 1 minute) {

    case _ : DontBotherMeException => Resume
    case _ : ExplodeException => Restart
    case _ : IamGodException => Stop
    case _ : Exception => Escalate
    }

或註解掉這一段程式,來了解 Akka Stragegy 的運作方式。

尤其注意在 Resume 後,Penguinhit 值,並沒有被 reset。

你可以依照以下的方式修改程式,觀察輸出的結果,來了解 Akka 的 Supervisor Strategy 運作方式

  • 在本 sample code 中,如果都不修改的話,是不會進到 IamGodException,因為在 ExplodeException後,會重啟 Actor,而 hit 值就會被改成 0,重頭計算。

  • 修改 ExplodeException => Resume,則會進到 IamGodException, 此時 東東 就會停止了,不能再使用。

  • 修改 ExplodeException => Escalate,則會發現全部的 Penguin actor 都被重啟了,也包括 Reporter

  • OneForOneStrategy 改成 AllForOneStrategy,則如果 東東 被重啟了,其他的 企鵝 也會被重啟。

可參考前兩篇的內容:

Akka Remote 簡介 (Deprecated)

Introduction of Akka Remote

Akka 允許遠端執行 Actor, 而且內建小型的 message server,在開發時,完全不用去理會底層網路的建置。要使用 Akka Remote 功能,要特別注意每台機器要彼此看得到。也就是說在網段的安排上,每台機器要彼此可以互連,因為 Akka Remote 會在每台機器,啟一個小 server,而且會彼此互連。

Akka 遠端執行,分成兩種模式如下:

模式

Lookup

Lookup 是在遠端 Server,先啟動 Actor,再讓 Client 連線使用。這種模式很類似傳統的 Client/Server 架構。

Deployment

顧名思意就是將 Local 端的 Actor,佈署到遠端的機器執行。在佈署執行環境時,還是需要將 Local 端的 Actor 放到 Remote 端。到時 Remote 端在執行時,會在自己的本機載入 Actor 來執行。

Actor 基本運作

在使用 Remote 功能前,先要了解 Actor 基本運作。

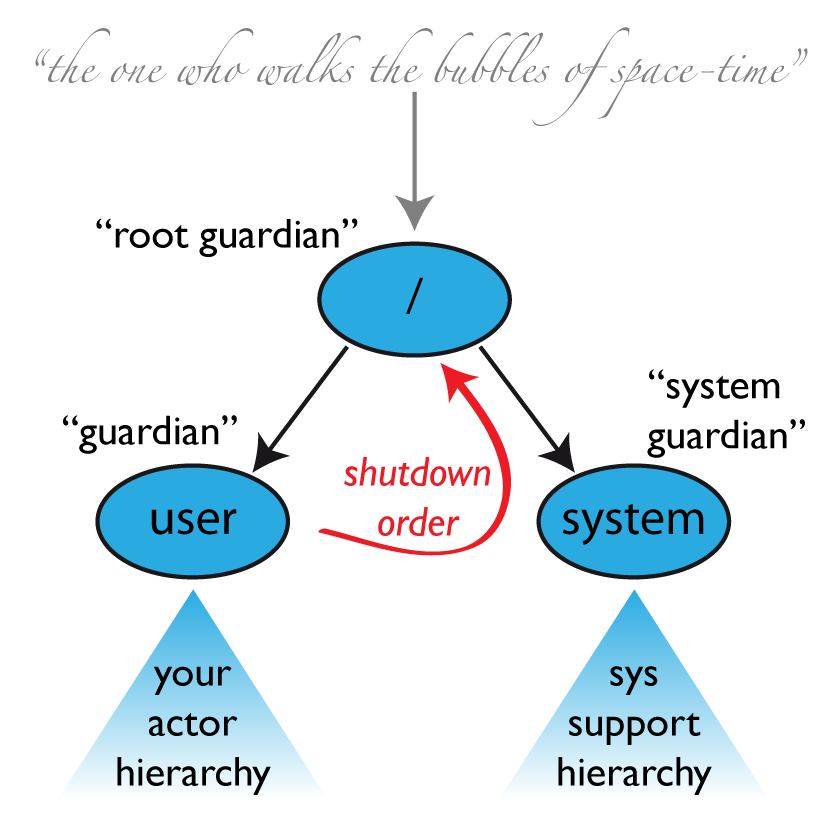
Actor 階層關係

每一個 Actor 都有一個 Supervisor,包含系統內建及自建的 Actor。如下圖:

The Top-Level Supervisors

Image from: Supervision and Monitoring

我們自己產生的 Actor 會被歸類在 user 這一群。請特別注意 useruser 在後面的談到的 Actor Path 會利用到。

在容錯的機制中,Supervisor 需要扮演監控及重啟 Child Actor 的角色,Akka 本身已有內建監控與重啟的 Strategy。如果沒有特別去 orverride,就會套用預設的機制。

Actor Path

每一個 Actor 都會有一個 Actor Path,如下:

"akka://my-sys/user/service-a/worker1"                   // purely local
"akka.tcp://my-sys@host.example.com:5678/user/service-b" // remote

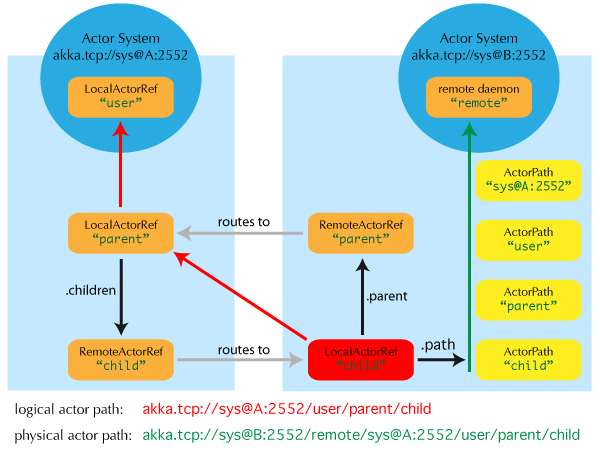
The Interplay with Remote Deployment

Code and image from Actor References, Paths and Addresses

簡單來說,在單機時:

val system = ActorSystem("HelloWorld")
val actor = system.actorOf(Props[MyActor], "MyHelloWorld")

上面 actor 的 path 會是 akka://HelloWorld/user/MyHelloWorld 也就是 akka://System_Name/user/Actor_Name,其中要特別注意 user,所以自己產生的 actor 都會被歸到 user 路徑下。

同理在遠端上 Actor path 就會像 akka.tcp://HelloWorld@host:port/user/MyHelloWorld

如果某個 actor 是被另一個 actor 產生時,則 path 會像:

akka://HelloWorld/user/parent/MyHelloWorld

Actor path 在系統中,是不能重覆的,因此在為 actor 命名時,要小心。

實作 - 把企鵝丟到遠處

延用上一篇 吃飯、睡覺、打東東 的梗,將企鵝的 Actor 放在遠端的機器上執行。Source code 放在我的 GitHub 上。

前置工作

  • 首先要修改 libraryDependencies 原本是用 "com.typesafe.akka" %% "akka-actor" % "2.3.4" 改成 Remote 版本 "com.typesafe.akka" %% "akka-remote" % "2.3.4"

  • 在專案的目錄,新加 src/main/resources,並且加到 eclipse 專案的 Source PATH。這個目錄等一下要放設定檔。

Lookup 模式

Lookup 模式像 Client/Server,比較好理解。先說明。

  • Lookup Server

      object LookupServer extends App {
    
        val system = ActorSystem("LookupServer", ConfigFactory.load("lookup-server"))
    
        val penguins = new Array[ActorRef](10)
    
        for (i <- 0 to 8) {
          penguins(i) = system.actorOf(Props(classOf[Penguin], s"Penguin-$i"), s"penguin-$i")
        }
    
        penguins(9) = system.actorOf(Props[DongDong], "dongdong")
    
      }
    

程式跟先前的差不多,主要差別在產生 ActorSystem 時,多了一個 ConfigFactory.load("lookup-server"),這個就是先前提到的設定檔,在開發環境下,會去 src/main/resources/ 目錄下找 lookup-server.conf

  • lookup-server.conf

      akka {
    
        actor {
          provider = "akka.remote.RemoteActorRefProvider"
        }
    
        remote {
          netty.tcp {
            hostname = "127.0.0.1"
            port = 2552
          }
        }
      }
    

原則上,只要寫好設定檔,在程式開好 Actor,就完成一個可以被遠端呼叫的 Server。

  • Lookup Client

      object LookupClient extends App {
        val system = ActorSystem("LookupClient", ConfigFactory.load("lookup-client"))
    
        val remotePath = "akka.tcp://LookupServer@127.0.0.1:2552/user/"
    
        val penguins = new Array[String](10)
    
        for (i <- 0 to 8) {
          penguins(i) = remotePath + (s"penguin-$i")
        }
    
        penguins(9) = remotePath + "dongdong"
    
        val reporter = system.actorOf(Props(classOf[Reporter], penguins), "reporter")
    
        /* 主程式等一下,要不然上面都是 non-blocking call,會直接結束程式 */
        Thread.sleep(10000)
        system.shutdown
        println("end")
      }
    
  • lookup-client.conf

      akka {
        actor {
          provider = "akka.remote.RemoteActorRefProvider"
        }
    
        remote {
          netty.tcp {
            hostname = "127.0.0.1"
            port = 2554
          }
        }
      }
    

Client 程式,先準備好遠端 Actor Path,然後傳給 Reporter 去呼叫遠端的 Penguin

  • Reporter

      class Reporter(var penguins: Array[String]) extends Actor {
        sendIdentifyRequest()
    
        def sendIdentifyRequest() {
          if (penguins != null) {
            penguins.foreach(path => context.actorSelection(path) ! Identify(path))
          }
          else {
            penguins = new Array[String](10)
            for (i <- 0 to 8) {
              val actor = context.actorOf(Props(classOf[Penguin], s"Penguin-$i"))
              actor ! Identify(actor.path.toString())
              penguins(i) = actor.path.toString()
              println(actor.path)
            }
    
            val dong = context.actorOf(Props[DongDong])
            dong ! Identify(dong.path.toString())
            penguins(9) = dong.path.toString()
            println(dong.path)
    
          }
          import context.dispatcher
          context.setReceiveTimeout(5 seconds) // 設定 timeout 5 seconds
        }
    
    
        var count = 0
        def receive = {
          case ActorIdentity(path, Some(actor)) =>
            count += 1
            if (count == penguins.length) {
              context.setReceiveTimeout(Duration.Undefined)
            }
    
            println(s"$path found")
            actor ! Interest()
    
          /* 有三個興趣的回覆 */
          case Three(name, a, b, c) => 
            println(s"$name: $a, $b, $c")
    
          /* 只有二個興趣的回覆,反問 why */      
          case Two(name, a, b) =>
            println(s"$name: $a, $b")
            sender() ! Why()
    
          /* 接到 why 的回覆 */
          case Because(name, msg) =>
            println(s"$name: $msg")
        }
    
        override def preStart() = {
          println("Reporter start")
        }
      }
    

Reporter 中,我們使用 Actor 內建的 context,來查詢遠端的 actor: context.actorSelection(path)

Reporter 跟先前一樣,但多了一個 sendIdentifyRequest 的函式,主要的功能是查詢遠端的 actor 或產生 actor 送到遠端;並確定遠端的 Actor 是否已經 ready。在 Akka Actor 內建處理 Identify 的功能,我們可以對某個 Actor 傳送 Identify, Identify 的參數可以自定,用來辨識。當 Actor 是 OK 的話,則會收到 ActorIdentity(id, Some(actor)),其中的 id 就是先前在 Identify 加入的辨識字串。如果 Actor 沒有 Ready 好的話,則會收到 ActorIdentity(id, None), 這時候,我們就可以知道那個 Actor 掛了。

執行起來的結果,你可以在 Server 的 console 上看到 Penguin output 的訊息,在 Client 端這邊,看到 Reporter 的 output。

Deployment 模式

Deployment 模式允許將 Local 端的 Actor 送到遠端的機器來執行。這個範例純用設定檔的方式,來佈署 Actor。Akka 也允許在程式內,自行動態佈署。

  • Deploy Server - 用來執行被佈署的 Actor

      object DeployServer extends App {
        val system = ActorSystem("DeployServer", ConfigFactory.load("deploy-server"))
      }
    

由上的範例,其實我們只要啟一個 ActorSystem 即可。

  • deploy-server.conf

      akka {
    
        actor {
          provider = "akka.remote.RemoteActorRefProvider"
        }
    
        remote {
          netty.tcp {
            hostname = "127.0.0.1"
            port = 2551
          }
        }
      }
    

其實跟上面的 lookup-server.conf 相似。

  • deploy-client.conf

      akka {
        actor {
          provider = "akka.remote.RemoteActorRefProvider"
    
          deployment {
            "/penguin/*" {
              remote = "akka.tcp://DeployServer@127.0.0.1:2551"
            }
          }
        }
    
        remote {
          netty.tcp {
            hostname = "127.0.0.1"
            port = 2553
          }
        }
      }
    

在 client 程式前,我們先看一下 client 的 conf 檔。跟先前的 lookup-client.conf 差不多,但多了一個 deployment 設定。上面的設定,是說明要將 actor path 是 /penguin/* 送到遠端執行。

  • Deploy Client - 將 Actor 送到 Server

      object DeployClient extends App {
        val system = ActorSystem("DeployClient", ConfigFactory.load("deploy-client"))
    
        val reporter = system.actorOf(Props(classOf[Reporter], null), "penguin")
    
        /* 主程式等一下,要不然上面都是 non-blocking call,會直接結束程式 */
        Thread.sleep(10000)
        system.shutdown
        println("end")
      }
    

我在 Client 只啟了一個 Reporter,且註冊 actor name 是 penguin,等一下我會用 Reporter 來產生 Penguin 並送到遠端的主機。

  • Reporter 跟上面的 code 一樣。特別看以下這一段:

      penguins = new Array[String](10)
      for (i <- 0 to 8) {
        val actor = context.actorOf(Props(classOf[Penguin], s"Penguin-$i"))
        actor ! Identify(actor.path.toString())
        penguins(i) = actor.path.toString()
        println(actor.path)
      }
    
      val dong = context.actorOf(Props[DongDong])
      dong ! Identify(dong.path.toString())
      penguins(9) = dong.path.toString()
      println(dong.path)
    

我用 Reporter 來產生 Penguin actor。在 Actor 中有 context 可以用來產生子 actor。由於 Reporter 的 actor name 是 penguin,這些子 Penguin 的 path 就會變成 /penguin/xx,就符合我們在 deploy-client.conf 設定檔上設定的 deployment 路徑 /penguin/*,佈署後,一樣使用 Identify 來確認是否完成佈署。

執行結果會像 lookup 模式,在 Server 端看到 Penguin 的 output,在 Client 端看到 Reporter 的 output。

前一篇: Akka 簡介

2014年7月28日 星期一

Akka 簡介 - (Deprecated)

Introduction of Akka

Akka 是多工運算的框架,用 Scala 撰寫,也有支援 Java API。Akka 最主要的目的是要解決 Synchronize 造成的效能問題,以及可能發生的 Dead-Lock 問題。

相關資料:

特性

Non-Blocking and Asynchronous

所有 Akka 上的運作都是 Non-Blocking,也就是說任何的動作,都會立即回應。因此已經習慣一個指令,等待一個動作的思維,必需要修正,否則寫出來的程式效能不好,也可能有很多 bug。

當然在實際的環境下,我們還是會有 Blocking call 的需求,Scala 本身就有提供這方面的 API 可用。但 Scala 相關的 eco-system 都建議能不用就不用,以免造成效能上的問題。

Event-Driven, Fire-And-Forgot and Actor

Actor 是 Akka 最基本,也是最重要的元素。 Akka 使用 Actor 來完成工作,並且可以透過自定的 message 來互相溝通,或者觸發指定的工作。最簡單的實作概念:你可以使用 Actor 來管理某個系統資源,但有其他的 Actor 需要使用時,可以透過自定的 message 來操作。舉例來說: A 是個管理 Log Queue 的 Actor,負責將傳來的資料,寫入 log 檔案。 當某個 process 有需要寫 log 時,就可以叫出 A,並對 A 傳送包含要寫入資料的 message。當傳送這個 message 後,process 並不會等待回覆的訊息,而是往下繼續自己的工作。

實作 Actor, 其實也是在實作一個 message 的處理。如果有寫過 Windows 相關的程式,就可以很容易想像。Actor 必需實作一個 receive 的 function 來處理當收到某個 message 時,應該要作什麼事情。雷同在 Windows 下某個 Button 被 Click 時,其實是 Windows 系統發出一個 WM_CLICK 給 Button,而我們會去實作 OnClick funtion 來處理收到 WM_CLICK

Fault-tolerance and Let It Crash

在多工運算下,容錯是件很重要的事情,Akk 採用 Let It Crash 的思維,會自動重啟已經 crash 的 Actor,當然重啟的 policy 也可以自定,沒有的話,Akka 在發現有 Exception 發生時,會自動重啟 Actor。Actor 本身的狀態或資料,跟 Actor 的工作是被分開的,也就是說,某個 Actor 在執行工作時,不幸 Crash 時,在還沒有被 Restart,已經修改的資料,是被保留下來的,此時,你可以選擇 Restart 將資料重新 reset 或者用 Resume 來繼續往下的工作。

Location Transparency

Akka 的 Actor 除了可以在本機上執行,也可以指定在遠端的某個機器執行,中間的網路溝通,akka 會自動幫忙處理,但也很重要的一點,你傳送的 message 必須是可以被 serialize。 Akka 是使用 netty 來處理 network。

實作

在實作前,建議去下載 Typesafe 的 Activator 工具,它會自動產生基本 Scala 開發環境設定,省去寫 SBT 的工作。安裝 Activator 很簡單,只要下載,解開就行了。

用 Activator 產生一個空白的專案:

  • 執行 activator new project_name minimal-scala
  • build.sbt 加入 akka library. libraryDependencies += "com.typesafe.akka" %% "akka-actor" % "2.3.4"
  • project/plugins.sbt 加入 eclipse plugin in. addSbtPlugin("com.typesafe.sbteclipse" % "sbteclipse-plugin" % "2.3.0")
  • 在 project 目錄下,執行 activator eclipse 來產生 Eclipse 的專案檔。

Akka Hello World

按慣例,先來個 hello world。以下的範例會產生一個 Actor ,來接收要對誰說 hello, world, 並回覆給原來的傳送者(sender)。

package com.example

import akka.actor.Actor
import akka.actor.ActorSystem
import akka.actor.Props
import akka.actor.Inbox
import scala.concurrent.duration._

/* 自定 Message */
case class ToWhom(name: String)
case class Response(msg: String)

/* Actor 回覆 Hi, name. Hello, world! */
class MyActor extends Actor {

  def receive = {
    case ToWhom(name) => sender() ! Response(s"Hi, $name. Hello, world!!")
  }

}

object HelloWorld extends App {

  /* 啟動 Akka micro-system */
  val system = ActorSystem("HelloWorld")

  /* 產生一個 Actor。 */
  val actor = system.actorOf(Props[MyActor], "MyHelloWorld")

  /* 看一下 Actor 註冊的 path。如果要重覆使用已產生的 Actor,就需要知道 Actor 的 path。
   * 這個在遠端執行很重要 
   * */
  val path = actor.path
  println(path)

  /* demo 使用已產生的 actor */
  val actor2 = system.actorSelection(path)

  /* 產生一個收信箱. 等一下用此收件箱的名義,對 MyActor 送訊息 */
  val inbox = Inbox.create(system)

  // 以下是多種傳 message 方式,且都是 non-blocking (Fire-and-Forgot)。
  // 方法1
  inbox.send(actor, ToWhom("小明"))
  // 方法2
  //actor.!(ToWhom("小華"))(inbox.getRef)
  // 方法3
  //actor.tell(ToWhom("東東"), inbox.getRef)

  // Blocking call,等待回覆訊息,最多等 5 sec。不等的話,程式會往下執行,就結束了。
  val Response(msg) = inbox.receive(5.seconds)
  println(msg)

  /* 記得要 shutdown, 要不然程式不會結束 */
  system.shutdown

  println("end")
}

小進階多個 Actor 互傳: 吃飯、睡覺、打東東

實際的情況,都是多個 Actor 彼此間在傳訊息。以下我們就用 吃飯、睡覺、打東東 的笑話來 demo。

package com.example.joke

import akka.actor.Actor
import akka.actor.ActorSystem
import akka.actor.Props
import akka.actor.ActorRef
import akka.actor.actorRef2Scala

trait Question
case class Interest() extends Question
case class Why() extends Question

trait Answer
case class Three(name: String, a: String, b: String, c: String) extends Answer
case class Two(name: String, a: String, b: String) extends Answer
case class Because(name: String, msg: String) extends Answer

/**
 * 企鵝
 */
class Penguin(val name: String) extends Actor {
  def receive = {
    case Interest() =>
      sender() ! Three(name, "吃飯", "睡覺", "打東東")
  }

  override def preStart() = {
    println(s"$name start")
  }
}

/**
 * 叫東東的企鵝
 */
class DongDong extends Penguin("東東") {
  override def receive = {
    case Interest() =>
      sender() ! Two(name, "吃飯", "睡覺")
    case Why() => sender() ! Because(name, "我就是" + name)
  }
}

/**
 * 記者
 */
class Reporter extends Actor {
  def receive = {
    /* 有三個興趣的回覆 */
    case Three(name, a, b, c) => 
      println(s"$name: $a, $b, $c")

    /* 只有二個興趣的回覆,反問 why */      
    case Two(name, a, b) =>
      println(s"$name: $a, $b")
      sender() ! Why()

    /* 接到 why 的回覆 */
    case Because(name, msg) =>
      println(s"$name: $msg")
  }
}

object JokeApp extends App {
  val system = ActorSystem("Joke")

  val reporter = system.actorOf(Props[Reporter], "reporter")

  val penguins = new Array[ActorRef](10)

  for (i <- 0 to 8) {
    penguins(i) = system.actorOf(Props(classOf[Penguin], s"Penguin-$i"))
  }

  penguins(9) = system.actorOf(Props[DongDong])

  /* 記者問每隻企鵝,牠的興趣是 */
  penguins.foreach(_.tell(Interest(), reporter))

  /* 主程式等一下,要不然上面都是 non-blocking call,會直接結束程式 */
  Thread.sleep(5000)
  system.shutdown
  println("end")
}

由上面程式的 output,就可以很明顯感覺到 non-blocking 的威力,即使我們程式是循序產生企鵝的物件,但是它們被初始化的順序卻不一定,傳送訊息也是如此。

Use PhantomJS to Get Images without GhostDriver

Use PhantomJS to Get Images without GhostDriver

Preface

I want to get image size from web page, especially from ajax web page. I use PhantomJS and GhostDriver. But the solution is slow because my scala program communicate PhantomJS via GhostDriver's micro-server. One image costs about 50 milli-seconds. I change to call PhantomJS directly and get results from it.

Use Scala Process

Use Scala's Process is very simple. You just import scala.sys.process._ and run a process with String_Cmd !. You can refer the scala document.

Use PhantomJS to Get Image Size

I write a javascript run by PhantomJS. I output the src, width, and height of images to console. The last line is result page source code. I also assign the exit code(ex: phantom.exit(1)). It is used in scala later.

var system = require('system');

if (system.args.length < 2) {
    console.log('phanthom crawl.js url');
    phantom.exit(1);
}

var url           = system.args[1]; 
var page          = require('webpage').create();
page.viewportSize = { width: 1280, height : 2400 };

/*console.log("url: " + url);*/

page.open(url, function (status) {
    /*console.log(status)*/
    if (status !== "success") {
        /*console.log('Unable to load url');*/
        phantom.exit(2);
    } else {
        /*console.log("ok");*/
        var results = page.evaluate(function() {
             var list = document.images, images = [], i;
             for (i = 0; i < list.length; i++) {
                var width = list[i].width, height = list[i].height;
                if (width == height && width >= 128)
                    images.push({src: list[i].src, width: list[i].width, height: list[i].height});
             }
             return images;
        });

        console.log(results.length)
        for (k = 0; k < results.length; k++) {
            console.log(results[k].width +"," + results[k].height + "," + results[k].src);
        }
        console.log(page.content)
        phantom.exit(0);
    }

});

You can save the sample code as crawl.js.

Scala call PhantomJS Process and Get Results

I can use ProcessLogger to get output of proces on console.

trait CrawlResponse

case class CrawlResult(product: Product) extends CrawlResponse

case class CrawlError(url: String, exitCode: Int) extends CrawlResponse

val result = new scala.collection.mutable.StringBuilder
  val error = new scala.collection.mutable.StringBuilder
  val log = ProcessLogger(line => result.append(line + "\n"), line => error.append(line + "\n"))

  def crawl(url: String): CrawlResponse = {
    result.clear
    error.clear
    val exitCode = (cmd + url) ! log

    if (exitCode == 0) {
      CrawlResult(Page(result.lines.toArray).toProduct(url))
    }
    else {
      CrawlError(url, exitCode)
    }  
  }

The cmd is phantomjs_path/bin/phantomjs your_path/crawl.js. (reserve a space after crawl.js). We run PhantomJS process with val exitCode = (cmd + url) ! log and get the exit code to verify if process is success. We can get the result strings with ProcessLogger.

2014年7月18日 星期五

Play Framework Step by Step

Play Framework Step by Step

Installation

Downoad Typesafe Activator Package

Although we can use SBT to build play framework project, I suggest use Activator. Activator can generate a new project, build, run and deploy it with SBT.

  • visit playframework and download the last version.

    Attention: The Play2 plugin for Scala 2.11 on eclipse is NOT ready now(2014/07/19)

  • unzip it and set path

      # TypeSafe
      export ACTIVATOR_HOME="/usr/local/activator"
      export PATH="$ACTIVATOR_HOME:$PATH"
    

Generate New Project

I develop with Scala 2.11, so I demo steps for scala.

Attention: You MUST have scala 2.11 plugins for eclipse or Scala-IDE

  • generate new project

    Move to your workspace and execute activator new your-project-name play-scala

  • convert to eclipse project format

    Move to your project folder and exec activator eclipse

  • import to eclipse

    Eclipse -> [File] -> [Import...] -> [General] -> [Existing Projects into Workspace]

Development

We have to add target/scala-2.11/twirl/main to source path because play2 plugins is not ready for scala 2.11. Play framework put templates (ex: main.scala.html) in app/views and convert to scala source in target/scala-2.11/twirl/main. We have to DIY when add template or change apply parameters. But you do not refresh project if you edit content in templates.

Add twirl to source path

Add target/scala-2.11/twirl/main to source path

Right click on your project -> [Properties] -> [Java Build Path] -> [Source] -> [Add Folder...] -> choose [target/scala-2.11/twirl/main] -> [OK]

DIY when add template or change apply(i.e. @(xx:xx) in template first line) parameters

  • open terminal and move to your project path
  • exec activator compile to compile project
  • back to eclipse and refresh project (Right click project -> [Refresh])

Attention: you may have ERROR if you do not compile and refresh manually

Run project when developing

Play framework auto-refresh codes, so we can see the result immediately.

  • exec activator run
  • browse http://localhost:9000 (the default port is 9000)

My Environment

  • OSX 10.9.4
  • Java 7
  • Scala 2.11

Environment Variables

#Scala
export SCALA_HOME=/usr/local/scala
export PATH=$SCALA_HOME/bin:$PATH

# TypeSafe
export ACTIVATOR_HOME="/usr/local/activator"
export PATH="$ACTIVATOR_HOME:$PATH"

2014年7月15日 星期二

Crawling Web Page with PhantomJS and WebDriver

PhantomJS

I crawl images in web page with PhantomJS and WebDriver. I summaries it below.

PhantomJS

PhantomJS is a headless web test tool with WebKit engine. It can handling javascript including AJAX.

Advantage:

  • Headless
  • Fast

Disadvantage:

  • Ajax is not always OK, especially Lazy-Load
  • CSS rendering is sometimes not the same with browser

Solution

We can use sample code of Christian Joudrey on GitHub. It wait some time when downloading resources. Although it does not solve problem totally, it is better than using PhantomJS only.

PhantomJS with WebDriver

  • Install GhostDriver
  • Edit twitter.js of Christian Joudrey

      var resourceWait  = 300,
          maxRenderWait = 10000;
    
      var page          = this, /* change to this for GhostDriver */
          count         = 0,
          forcedRenderTimeout,
          renderTimeout;
    
      page.viewportSize = { width: 1280,  height : 1024 };
    
      function doRender() {
    
      }
    
      page.onResourceRequested = function (req) {
          count += 1;
          console.info('> ' + req.id + ' - ' + req.url);
          clearTimeout(renderTimeout);
      };
    
      page.onResourceReceived = function (res) {
          if (!res.stage || res.stage === 'end') {
              count -= 1;
              console.info(res.id + ' ' + res.status + ' - ' + res.url);
              if (count === 0) {
                  renderTimeout = setTimeout(doRender, resourceWait);
              }
          }
      };
    
  • Scala Sample Code

      package phantom
    
      import org.openqa.selenium.remote.DesiredCapabilities
      import org.openqa.selenium.phantomjs.PhantomJSDriver
      import java.util.concurrent.TimeUnit
      import scala.collection.JavaConversions._
      import org.apache.commons.lang3.StringUtils
      import org.openqa.selenium.OutputType
      import java.io.File
      import org.apache.commons.io.FileUtils
      import org.openqa.selenium.Dimension
    
      object Phantom extends App {
        val url = if (args.length >= 1) args(0) else "http://test.tw"
        val snapShotFile = if (args.length >= 2) args(1) else "simple-phantom.jpg"
        val dumpFile = if (args.length >= 3) args(2) else "simple-phantom.html"
    
    
        val capabilities = new DesiredCapabilities()
        // Set PhantomJS Path
        capabilities.setCapability("phantomjs.binary.path", "PHANTOM_HOME/bin/phantomjs")
        val driver = new PhantomJSDriver(capabilities)
    
        // execute modified codes of cjoudrey's twitter
        val extra = scala.io.Source.fromFile("InitPhantom.js").getLines.mkString
        driver.executePhantomJS(extra)
    
        // crawl page
        driver.get(url)
    
        // find images in page
        driver.findElementsByTagName("img").foreach(img => {
          if (StringUtils.isNotBlank(img.getAttribute("src"))) {
            val dim = img.getSize()
            val pos = img.getLocation()
            println(img.getAttribute("src"), pos.x, pos.y, dim.width, dim.height)
          }
        })
    
        // generate a snapshot image
        val shot: File = driver.getScreenshotAs(OutputType.FILE)
        FileUtils.copyFile(shot, new File(snapShotFile))
    
        // dump the result html code (contain the execution result of ajax)
        val source = driver.getPageSource()
        FileUtils.writeStringToFile(new File(dumpFile), source, "UTF-8")    
        driver.close()
        driver.quit() 
      }
    

2014年7月1日 星期二

Scala Access Level

Scala 的 Access Level 觀念和 Java 差不多,但用法很大的不同,而且 Scala 給予的彈性比 Java 來得高,也因此更方便設計系統。

Java Access Level

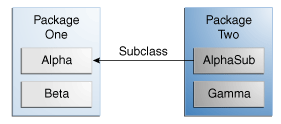
資料來源
Java 沒有宣告時(no explicit modifier),是 package-private, 並非 public 這點要特別注意的。package-private是指可以在同 package 被存取,但 subclass 卻不行。
Java 說明文件的表格,可以了解什麼是 package_private
Modifier Class Package Subclass World
public Y Y Y Y
protected Y Y Y N
no modifier
(package-private)
Y Y N N
private Y N N N
實例
Modifier Alpha Beta AlphaSub Gamma
public Y Y Y Y
protected Y Y Y N
no modifier
(package-private)
Y Y N N
private Y N N N

Scala Access Level 基本

仿造 Java 文件的上範例
package one {

  class Alpha {
    val a = 1
    protected val b = 2
    private val c = 3

    def func() {
      a
      b
      c
    }
  }


  class Beta {
    def test() {
      val alpha = new Alpha()

      alpha.a
      alpha.b // error: value b in class Alpha cannot be accessed in one.Alpha Access to protected value b not permitted because enclosing class Beta in package one is not a subclass of class Alpha in package one where target is defined
      alpha.c // error: value c in class Alpha cannot be accessed in one.Alpha

    }
  }
}

package two {

  class AlphaSub extends one.Alpha {

    def test() {
      this.a
      this.b
      this.c // error: value c in class Alpha cannot be accessed in two.AlphaSub
    }
  }

  class Gamma {
    def test() {
      val alpha = new one.Alpha

      alpha.a
      alpha.b // error: value b in class Alpha cannot be accessed in one.Alpha Access to protected value b not permitted because enclosing class Gamma in package two is not a subclass of class Alpha in package one where target is defined
      alpha.c // error: value c in class Alpha cannot be accessed in one.Alpha

    }

  }

}
由上面的範例可以整理出
Modifier Alpha Beta AlphaSub Gamma
no modifier
(public)
Y Y Y Y
protected Y N Y N
private Y N N N
Scala 沒有宣告的話,則是 public,與 Java (package-private) 不同。 protected 在 Scala 也與 Java 不同,在 Java 中,protected 可以被同 package 存取,但 Scala 不行。
Modifier Scala Java
no modifier public package-private
protected 自己, subclass 自己, subclass, 同 package

Scala Access Level 進階

Scala 有比 Java 更彈性的 Access control,在 Scala 中,可以宣告 modifier[package or class] 的方式,ex: private[one],來實作不同等級的 access control。

實作 Java Package-Private

修改上面的範例,在 Alpha 中新加 private[one] val d = 4 這個變數。這個變數的存取等級就同 Java 的 package-private,在同 package 可以被存取,但 subclass 卻不行。
ex:
package one {

  class Alpha {
    val a = 1
    protected val b = 2
    private val c = 3

    private[one] val d = 4 // package-private

    def func() {
      a
      b
      c
      d
    }
  }


  class Beta {
    def test() {
      val alpha = new Alpha()

      alpha.a
      alpha.b // error: value b in class Alpha cannot be accessed in one.Alpha Access to protected value b not permitted because enclosing class Beta in package one is not a subclass of class Alpha in package one where target is defined
      alpha.c // error: value c in class Alpha cannot be accessed in one.Alpha

      alpha.d
    }
  }
}

package two {

  class AlphaSub extends one.Alpha {

    def test() {
      this.a
      this.b
      this.c // error: value c in class Alpha cannot be accessed in two.AlphaSub
      this.d // error: value d in class Alpha cannot be accessed in two.AlphaSub
    }
  }

  class Gamma {
    def test() {
      val alpha = new one.Alpha

      alpha.a
      alpha.b // error: value b in class Alpha cannot be accessed in one.Alpha Access to protected value b not permitted because enclosing class Gamma in package two is not a subclass of class Alpha in package one where target is defined
      alpha.c // error: value c in class Alpha cannot be accessed in one.Alpha
      alpha.d // error: value d in class Alpha cannot be accessed in one.Alpha
    }

  }

}

授與 Private Constructor 使用權

Java 的 private Constructor 常用在 Singleton,除了自身外,外界都無法使用。但 Scala 卻可以授與這項權力給指定的 package 或 class。
以下是我自己寫的 Enumeration. 其中的 final case class Planet private[Planets] (mass: Double, radius: Double) extends Val 就是將 Planet 的 private constructor 授與 Planets
object Planets extends Enumeration {

  val G: Double = 6.67300E-11

  final case class Planet private[Planets] (mass: Double, radius: Double) extends Val {
    def surfaceGravity(): Double = G * mass / (radius * radius)
    def surfaceWeight(otherMass: Double): Double = otherMass * surfaceGravity()
  }

  val Mercury = Planet(3.303e+23, 2.4397e6)
  val Venus = Planet(4.869e+24, 6.0518e6)
  val Earth = Planet(5.976e+24, 6.37814e6)
  val Mars = Planet(6.421e+23, 3.3972e6)
  val Jupiter = Planet(1.9e+27,   7.1492e7)
  val Saturn = Planet(5.688e+26, 6.0268e7)
  val Uranus = Planet(8.686e+25, 2.5559e7)
  val Neptune = Planet(1.024e+26, 2.4746e7)


  def main(args: Array[String]) {
    require(args.length == 1, "Usage: java Planet <earth_weight>")

    val earthWeight = args(0).toDouble  
    val mass = earthWeight / Planets.Earth.surfaceGravity

    Planets.values.foreach(p => println("Your weight on %s is %f%n".format(p, p.asInstanceOf[Planet].surfaceWeight(mass))))
  }

}

限 Instance 存取

在 Scala 中,可以利用 private[this] 來限定只能是同 instance 才能存取,這項限制比 private 更加嚴格,這也許是 Scala 標榜平行運算下的產物。
ex:
class TestPrivateThis {
  private[this] val a = 10

  def func(): Int = a + 10

  def func(that: TestPrivateThis): Int = a + that.a // error: value a is not a member of TestPrivateThis
}

總結

Scala 在設計上,比較符合一般印象中的 access level,No modifier = public. protected 只能自己與 subclass 存取;且 Scala 比 Java 更為彈性。