Introduction of Akka Remote
Akka 允許遠端執行 Actor, 而且內建小型的 message server,在開發時,完全不用去理會底層網路的建置。要使用 Akka Remote 功能,要特別注意每台機器要彼此看得到。也就是說在網段的安排上,每台機器要彼此可以互連,因為 Akka Remote 會在每台機器,啟一個小 server,而且會彼此互連。
Akka 遠端執行,分成兩種模式如下:
模式
Lookup
Lookup 是在遠端 Server,先啟動 Actor,再讓 Client 連線使用。這種模式很類似傳統的 Client/Server 架構。
Deployment
顧名思意就是將 Local 端的 Actor,佈署到遠端的機器執行。在佈署執行環境時,還是需要將 Local 端的 Actor 放到 Remote 端。到時 Remote 端在執行時,會在自己的本機載入 Actor 來執行。
Actor 基本運作
在使用 Remote 功能前,先要了解 Actor 基本運作。
Actor 階層關係
每一個 Actor 都有一個 Supervisor,包含系統內建及自建的 Actor。如下圖:
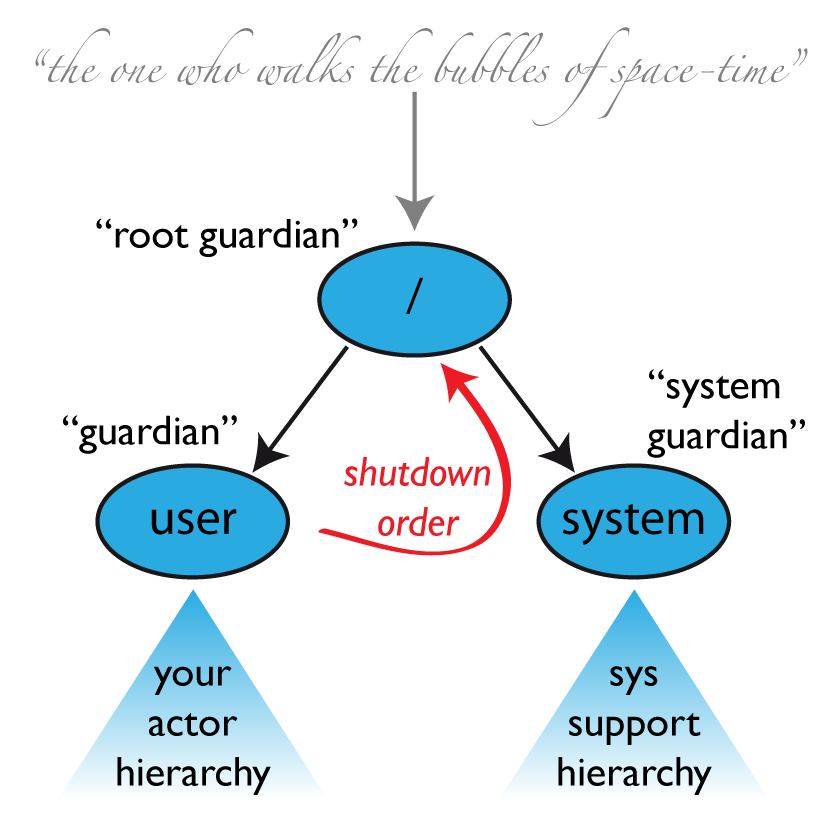
Image from: Supervision and Monitoring
我們自己產生的 Actor 會被歸類在 user 這一群。請特別注意 user。user 在後面的談到的 Actor Path 會利用到。
在容錯的機制中,Supervisor 需要扮演監控及重啟 Child Actor 的角色,Akka 本身已有內建監控與重啟的 Strategy。如果沒有特別去 orverride,就會套用預設的機制。
Actor Path
每一個 Actor 都會有一個 Actor Path,如下:
"akka://my-sys/user/service-a/worker1"                   // purely local
"akka.tcp://my-sys@host.example.com:5678/user/service-b" // remote

Code and image from Actor References, Paths and Addresses
簡單來說,在單機時:
val system = ActorSystem("HelloWorld")
val actor = system.actorOf(Props[MyActor], "MyHelloWorld")
上面 actor 的 path 會是 akka://HelloWorld/user/MyHelloWorld 也就是 akka://System_Name/user/Actor_Name,其中要特別注意 user,所以自己產生的 actor 都會被歸到 user 路徑下。
同理在遠端上 Actor path 就會像 akka.tcp://HelloWorld@host:port/user/MyHelloWorld。
如果某個 actor 是被另一個 actor 產生時,則 path 會像:
akka://HelloWorld/user/parent/MyHelloWorld
Actor path 在系統中,是不能重覆的,因此在為 actor 命名時,要小心。
實作 - 把企鵝丟到遠處
延用上一篇 吃飯、睡覺、打東東 的梗,將企鵝的 Actor 放在遠端的機器上執行。Source code 放在我的 GitHub 上。
前置工作
首先要修改
libraryDependencies原本是用"com.typesafe.akka" %% "akka-actor" % "2.3.4"改成 Remote 版本"com.typesafe.akka" %% "akka-remote" % "2.3.4"在專案的目錄,新加
src/main/resources,並且加到 eclipse 專案的Source PATH。這個目錄等一下要放設定檔。
Lookup 模式
Lookup 模式像 Client/Server,比較好理解。先說明。
Lookup Server
  object LookupServer extends App {

    val system = ActorSystem("LookupServer", ConfigFactory.load("lookup-server"))

    val penguins = new Array[ActorRef](10)

    for (i <- 0 to 8) {
      penguins(i) = system.actorOf(Props(classOf[Penguin], s"Penguin-$i"), s"penguin-$i")
    }

    penguins(9) = system.actorOf(Props[DongDong], "dongdong")

  }
程式跟先前的差不多,主要差別在產生 ActorSystem 時,多了一個 ConfigFactory.load("lookup-server"),這個就是先前提到的設定檔,在開發環境下,會去 src/main/resources/ 目錄下找 lookup-server.conf
lookup-server.conf
  akka {

    actor {
      provider = "akka.remote.RemoteActorRefProvider"
    }

    remote {
      netty.tcp {
        hostname = "127.0.0.1"
        port = 2552
      }
    }
  }
原則上,只要寫好設定檔,在程式開好 Actor,就完成一個可以被遠端呼叫的 Server。
Lookup Client
  object LookupClient extends App {
    val system = ActorSystem("LookupClient", ConfigFactory.load("lookup-client"))

    val remotePath = "akka.tcp://LookupServer@127.0.0.1:2552/user/"

    val penguins = new Array[String](10)

    for (i <- 0 to 8) {
      penguins(i) = remotePath + (s"penguin-$i")
    }

    penguins(9) = remotePath + "dongdong"

    val reporter = system.actorOf(Props(classOf[Reporter], penguins), "reporter")

    /* 主程式等一下,要不然上面都是 non-blocking call,會直接結束程式 */
    Thread.sleep(10000)
    system.shutdown
    println("end")
  }
lookup-client.conf
  akka {
    actor {
      provider = "akka.remote.RemoteActorRefProvider"
    }

    remote {
      netty.tcp {
        hostname = "127.0.0.1"
        port = 2554
      }
    }
  }
Client 程式,先準備好遠端 Actor Path,然後傳給 Reporter 去呼叫遠端的 Penguin。
Reporter
  class Reporter(var penguins: Array[String]) extends Actor {
    sendIdentifyRequest()

    def sendIdentifyRequest() {
      if (penguins != null) {
        penguins.foreach(path => context.actorSelection(path) ! Identify(path))
      }
      else {
        penguins = new Array[String](10)
        for (i <- 0 to 8) {
          val actor = context.actorOf(Props(classOf[Penguin], s"Penguin-$i"))
          actor ! Identify(actor.path.toString())
          penguins(i) = actor.path.toString()
          println(actor.path)
        }

        val dong = context.actorOf(Props[DongDong])
        dong ! Identify(dong.path.toString())
        penguins(9) = dong.path.toString()
        println(dong.path)

      }
      import context.dispatcher
      context.setReceiveTimeout(5 seconds) // 設定 timeout 5 seconds
    }


    var count = 0
    def receive = {
      case ActorIdentity(path, Some(actor)) =>
        count += 1
        if (count == penguins.length) {
          context.setReceiveTimeout(Duration.Undefined)
        }

        println(s"$path found")
        actor ! Interest()

      /* 有三個興趣的回覆 */
      case Three(name, a, b, c) =>
        println(s"$name: $a, $b, $c")

      /* 只有二個興趣的回覆,反問 why */
      case Two(name, a, b) =>
        println(s"$name: $a, $b")
        sender() ! Why()

      /* 接到 why 的回覆 */
      case Because(name, msg) =>
        println(s"$name: $msg")
    }

    override def preStart() = {
      println("Reporter start")
    }
  }
在 Reporter 中,我們使用 Actor 內建的 context,來查詢遠端的 actor: context.actorSelection(path)。
Reporter 跟先前一樣,但多了一個 sendIdentifyRequest 的函式,主要的功能是查詢遠端的 actor 或產生 actor 送到遠端;並確定遠端的 Actor 是否已經 ready。在 Akka Actor 內建處理 Identify 的功能,我們可以對某個 Actor 傳送 Identify, Identify 的參數可以自定,用來辨識。當 Actor 是 OK 的話,則會收到 ActorIdentity(id, Some(actor)),其中的 id 就是先前在 Identify 加入的辨識字串。如果 Actor 沒有 Ready 好的話,則會收到 ActorIdentity(id, None), 這時候,我們就可以知道那個 Actor 掛了。
執行起來的結果,你可以在 Server 的 console 上看到 Penguin output 的訊息,在 Client 端這邊,看到 Reporter 的 output。
Deployment 模式
Deployment 模式允許將 Local 端的 Actor 送到遠端的機器來執行。這個範例純用設定檔的方式,來佈署 Actor。Akka 也允許在程式內,自行動態佈署。
Deploy Server - 用來執行被佈署的 Actor
  object DeployServer extends App {
    val system = ActorSystem("DeployServer", ConfigFactory.load("deploy-server"))
  }
由上的範例,其實我們只要啟一個 ActorSystem 即可。
deploy-server.conf
  akka {

    actor {
      provider = "akka.remote.RemoteActorRefProvider"
    }

    remote {
      netty.tcp {
        hostname = "127.0.0.1"
        port = 2551
      }
    }
  }
其實跟上面的 lookup-server.conf 相似。
deploy-client.conf
  akka {
    actor {
      provider = "akka.remote.RemoteActorRefProvider"

      deployment {
        "/penguin/*" {
          remote = "akka.tcp://DeployServer@127.0.0.1:2551"
        }
      }
    }

    remote {
      netty.tcp {
        hostname = "127.0.0.1"
        port = 2553
      }
    }
  }
在 client 程式前,我們先看一下 client 的 conf 檔。跟先前的 lookup-client.conf 差不多,但多了一個 deployment 設定。上面的設定,是說明要將 actor path 是 /penguin/* 送到遠端執行。
Deploy Client - 將 Actor 送到 Server
  object DeployClient extends App {
    val system = ActorSystem("DeployClient", ConfigFactory.load("deploy-client"))

    val reporter = system.actorOf(Props(classOf[Reporter], null), "penguin")

    /* 主程式等一下,要不然上面都是 non-blocking call,會直接結束程式 */
    Thread.sleep(10000)
    system.shutdown
    println("end")
  }
我在 Client 只啟了一個 Reporter,且註冊 actor name 是 penguin,等一下我會用 Reporter 來產生 Penguin 並送到遠端的主機。
Reporter 跟上面的 code 一樣。特別看以下這一段:
  penguins = new Array[String](10)
  for (i <- 0 to 8) {
    val actor = context.actorOf(Props(classOf[Penguin], s"Penguin-$i"))
    actor ! Identify(actor.path.toString())
    penguins(i) = actor.path.toString()
    println(actor.path)
  }

  val dong = context.actorOf(Props[DongDong])
  dong ! Identify(dong.path.toString())
  penguins(9) = dong.path.toString()
  println(dong.path)
我用 Reporter 來產生 Penguin actor。在 Actor 中有 context 可以用來產生子 actor。由於 Reporter 的 actor name 是 penguin,這些子 Penguin 的 path 就會變成 /penguin/xx,就符合我們在 deploy-client.conf 設定檔上設定的 deployment 路徑 /penguin/*,佈署後,一樣使用 Identify 來確認是否完成佈署。
執行結果會像 lookup 模式,在 Server 端看到 Penguin 的 output,在 Client 端看到 Reporter 的 output。
前一篇: Akka 簡介
沒有留言:
張貼留言